Selecting a mouse is an extremely personal choice. Although Logitech Wireless Mouse isn’t cheap. You’ll be able to find this Logitech Wireless Mouse at a very inexpensive price. If you are facing Logitech wireless mouse not working issue then read this guide.
How we can fix Logitech Wireless Mouse Not Working
There are three methods to fix this Logitech mouse issue. But before applying any solution, first, make sure that there is no issue with the mouse. Attach your mouse with another computer and check if still, Logitech wireless mouse is working or not.
Method 1: Remove batteries for 5 seconds
- First of all, remove all the batteries of your Logitech Wireless Mouse and after 5 seconds insert them again. Now try to connect Mouse and see if it is working or not.
Method 2: Check Mouse Driver
Make sure that you are using the latest version of Logitech Wireless Mouse for Windows 10. Logitech has updated its drivers for Windows 10 Compatibility. So Download Logitech Wireless Mouse Drivers and install them again.
After installing, Reboot your PC or Laptop and see if it is working or not.
To manually check drivers, open RUN, and Type devmgmt.msc.

This will open the Device Manager window.
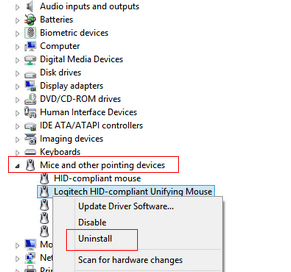
Go to the device list and use the arrow key to find category Mice and other pointing devices.
Expand the category > Find Logitech mouse. If you see a yellow mark then, there is a problem with the driver.
Right Click on it and select Uninstall, then reboot the system.

Instead of install drivers manually, you can download and use Driver Tools like Driver Easy. This tool will automatically download and install all the latest Drivers on your computer.

Method 3: Change USB port
If you are using Wireless USB then first of all check USB port. Make sure that it is working fine. If the issue with USB port then repair it.
Thank you for reading this guide.
Feel free to comment below.
