Headphones enable you to customize your listening level without disturbing different individuals in your general vicinity. Ensure your speaker or headphone is correctly plugged in. Consumer headphones are the absolute most feature-packed. If you are using Headphone and after installing the new Windows 10 update, your Headphones stopped working then this article will help you. Here we will share how to Fix Headphone Not Working Windows 10.
If you would like to receive your headphones working again, you will need to manually allow the headphone jack on your computer employing the Sound” native configuration utility. If headphones or anything else is on the line-out the audio isn’t going to be made by the computer’s built-in speakers.
Headphone Not Working Windows 10
If there is it on the headphones, then you probably have a speaker problem, and you will need to send the computer off for repair. In the event the sound has dropped out on your computer, it might be due to a couple common explanations. Make certain there aren’t any external audio devices plugged into your PC.
The headphone not working after Windows 10 update issue is a very common issue faced by Windows 10 users. After this Windows 10 Creators Update, there are some issues with your headphone.
If your computer has another port, plug your headphones into a different port and see if the issue is still there or not. Also, try the headphones with another device or computer. If you can not hear the sound on a different computer, the problem is with your headphones. And If it is working with another PC, then you can find these solutions to repair the issue on your computer.
Microsoft has confirmed the issue with headphone drivers and other issues.
Solution 1: Show and enable the headphones
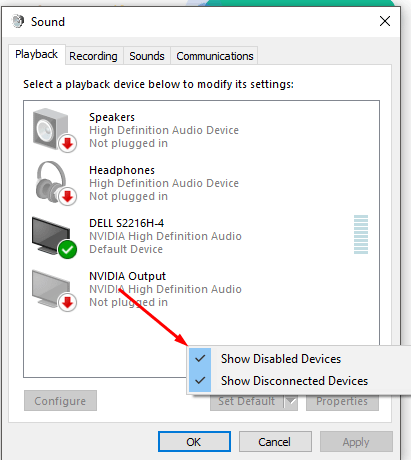
1) Open Playback devices from the taskbar icon at the right side.
2) Right-click the blank place > select Show Disconnected Devices > Show Disabled Devices.

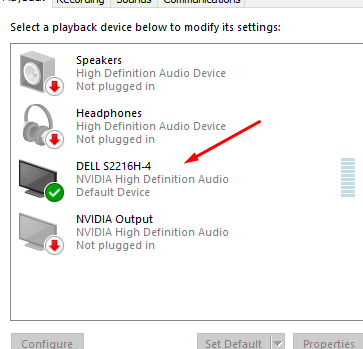
You’ll see headphones appear in the Playback devices. Right-click the headphones > Enable.

3) After the device is enabled and Set it Default. It will highlight with Green icon once set as default.
4) Click OK > Apply. Done.
Solution 2: Uninstall then reinstall the audio driver
The problem could be due to audio driver issues. To fix the problem, you can try to uninstall then reinstall the audio driver.
Follow steps below to uninstall the audio driver in Device Manager, then reinstall the audio driver.
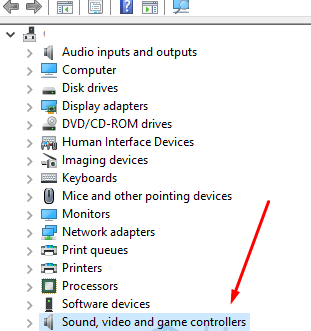
1) Open Run using Win + R and then Type devmgmt.msc > OK.

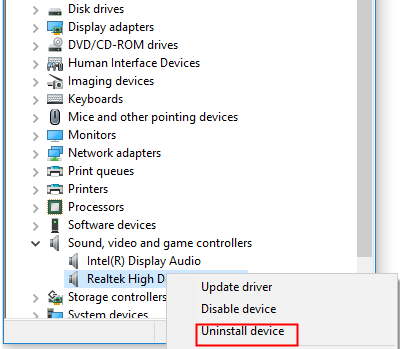
2) Double-click Sound, video and game controllers to expand > Right click the driver and select Uninstall.


3) Reboot PC. Now go to Realtek website and download compatible Realtek High Definition Audio drivers.
Solution 3: Update the audio driver
Now still if you are facing the issue, update the drivers. You can manually download the drivers from the Realtek Website or use driver update tools to download and install drivers automatically.
Thanks for reading this guide on how to Fix Headphone Not Working issue in Windows 10. Share your views in the comment box.
