Usage of Guest accounts is a must. One fine day, if some of your guest want to check their mail or just surf internet, you sure as heck don’t want to give your account. This is how Guest account comes to your rescue. Although the ability to add guest account Windows 10 was removed from Windows, However, the elements needed to create the guest account are still present, which makes it possible to create your very own restricted Windows 10 guest login, to let guests use your PC. It just takes a bit of user assembly.
Create Guest account on Windows 10
The concept of a guest account is fantastic. With this, you get one with a locked-down approach by which other people can use your PC, access internet, settings and everything else which is present. But the point is, when the was rolled out, the guest account thing disappeared.
Method 1 – Create Guest account Windows 10
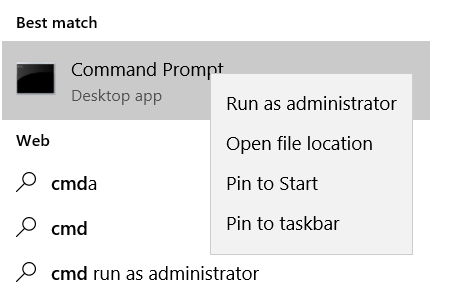
Step 1: Open Start and search for Command Prompt.
Step 2: Right click the CMD and from there select Run as administrator.

Step 3: So now begins the process to make a guest account. Let us create a guest account with the name ‘ABC’. Well, of course, you can add whatever name you want. Just do not write the name as “Guest” as Windows reserve it.
Type this –
net user ABC /add /active:yes

Step 4: Once you create a guest account, execute the command which is given below. It will help you in adding up a password to the guest account you just made. Since this is a Windows 10 guest account we do not want to add a password to it, so hit Enter to skip.
net user TWC *
Step 5: After this, you have to delete the account which is now newly created. And then add Guest account Windows 10 to the guest’s group. The commands which are mentioned below will help you do that. All you have to do is one by one enter these commands. And you are almost done.
- net localgroup users TWC /delete
- net localgroup guests TWC /add
Voila! Your guest account is created.
Also Check:
Method 2 – Create guest account Windows 10 using user account settings
Step 1: Search USER in the start menu and click on User Accounts.
Step 2: Click on Manage another Account.

Step 3: In PC Settings click on“Add a New User”.

Step 4: Now this is important for you to make sure that you are in the right Family. Also, check the other users section and at the bottom right-hand corner, click on Add someone else to this PC.

Step 5: You will be asked in the next window about how this person is going to sign it. Now what you have to do is at the bottom click on “The person I want to add doesn’t have an email address.”
Step 6: Click on the option – “Add a user without a Microsoft account.”
Step 7: Now as the final touch, all you have to do to finish things up. Write the name that you want to. Yes, remember, you cannot just use “guest.” You will have to add a password to complete the process, but you do not have to worry about it. You can create any password like xyz or 123. Now to finish, just go and click on the next button that is highlighted in blue by now.
Now if you want to check whether your guest account has been added correctly or not follow the steps. Press the Start Button and type “User.” Now go and visit the User and from there you can click on manage accounts.
Don’t miss:
Method 3 – Create guest account using local groups and policy
Step 1: Search lusrmgr.msc and click on the available option.

Step 2: Click on Users which is present in Local Users and Groups.

Step 3: From Guest account got to Guest Properties Windows. Type in a desired guest account name that you want.

Step 4: To make sure that this method work you have to deselect “Account is Disabled.” Click on Apply and OK.
After creating a Windows 10 guest account here are some other methods for “how to create guest account on Windows 10 if there is no built-in guest account”. Using these methods, you can enable and disable the account.
Method 4 – Enable or disable the Guest account
Part 1: Turn on Guest account.
Step 1: Go and Click the start button. Now in the search box type guest and tap “Turn guest account on or off.”
Step 2: Click Guest in the Manage Accounts window.

Step 3: Choose turn on.
Part 2: Turn off Guest account.
Step 1: Search input guest from the start menu and click “Turn guest account on or off.”
Step 2: Tap Guest to continue.

Step 3: Click Turn off the guest account.
Method 5 – Disable or Enable the Guest account in the Local Group Policy
Step 1: Open Local Group Policy Editor.
Step 2: Now you have to open “Accounts: Guest account status.”
You can visit the following path- >> Computer Configuration >> Windows Settings >> Security Settings >> Local Policies >> Security Options.
Step 3: Enable or disable the policy.
- Select Enabled and after that click OK to enable it.
- Choose Disabled and tap OK to have it disabled.
Method 6 – To Enable or Disable Guest Account
Step 1: Open Computer Management.
To open run, press Windows+R. Type compmgmt.msc and then click OK to open it.
Step 2: Now you have to find and open the Guest account which you have made.
Step 3: Enable or disable it.
- From here deselect “Account is disabled.” After that click OK in the Guest Properties dialog.
- Now if you want to disable, Select “Account is disabled” and tap OK to disable it.
Well, After learning several methods for “how to create a guest account on Windows 10”, users face problem while switching to their freshly created guest account. Here is a simple method which will help you to access your visitors account quickly.
How to switch to the guest account in Windows 10
Step 1: Click the Windows button.
Step 2: Click on your username.
Step 3: Click Visitor.
How to Set a Password For The Guest Account
Guest account is one such which usually do not have a password. But still, in any case, you want to make it password protected, you can follow the steps given below-
Step 1: Login as the Administrator.
Step 2: Go to Start Menu and Open Run. There type “Command” and press Ok.
Step 3: Now the DOS window which is opened now, type the following and press Enter key.
Net user guest *
Step 4: Enter the password.
Step 5: Re-enter the password.
Note:-
Now, if you want to remove the password, the process again is simple. You have to follow the exact the same procedure. Or you can follow the usual steps that you used to, by now. Go to Control Panel, from there visit User Accounts and there you will see the guest account that you have made. You can easily change the password from there.
How to Delete Guest Accounts in Windows 10
Log in using your Admin Account as it is a must before performing the steps given below.
Step 1: Open Settings.
Step 2: Go to Accounts.
Step 3: From the Left Menu- Select Family & other people.
Step 4: Now under Other People, you may find the guest account you created earlier.
Step 5: Click on the option and select Remove. Now the account data along with the account itself will be completely removed from your computer.
This was how to create guest account on Windows 10 and remove Guest accounts on Windows 10. All these methods are trusted and won’t block your device. If you have any queries regarding any method feel free to ask in the comment section below.