Windows 10 has become the talk of the town, not only because of the incredible features that I offer but also due to the errors. From BSOD errors to errors due to outdated drivers, we have talked about a lot of them. But today we are going to tell you about one new component of Windows 10 that very few people know about. If you have recently installed the 7-Zip file, then you will notice an option like CRC-CHA in your context menu. Apart from this, there are several more entries like CRC-32 and CRC-64 or SHA-256 and SHA-1 that you can find after the installation of the 7-Zip file. So in this article, we are going to cover everything about the crc sha tool and how to remove CRC-SHA from the context menu in Windows 10.
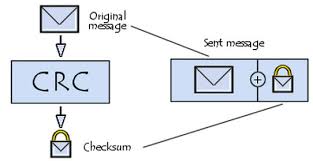
What is CRC?

CRC or Cyclic Redundancy Check is the error detecting code with which the accidental changes made to raw data can be detected. It supports storage devices and digital networks. CRCs are used for error correction.
They are called so because the check value is a redundancy, and the cyclic codes on which the algorithm is based. They are popular because of its easy implementation in binary hardware. CRCs are good at mathematical analyzation, detection of common errors in transmission channels by noise.
What is SHA?

National Institute of Standards and Technology (NIST) introduced SHA or Secure Hash Algorithm as the family of cryptographic hash functions. There are various types like SHA-0, SHA-1, SHA-2, and SHA3, so on and so forth.
It is basically used to calculate the integrity of the information that you have downloaded. It makes sure that it doesn’t get corrupted in any stage of download. If you want to know more about these two security algorithms, then keep your reading glasses on as we go a little deep about them together in the next section.
What is CRC-SHA?

The CRC-SHA entry accompanies the 7-ZIP file in Windows 10/8.1/8/7 Operating System. CRC means Cyclic Redundancy Check. This function is employed for identifying and checking the changes that have made to the data in the digital networks.
The complementary component of CRC, is the Secure Hash algorithm, abbreviated to SHA. The potent use of this component is determining the integrity of the downloaded data. It is just not seen in Windows 10, crc sha Windows 8/8.1/7 is also possible.
Plenty of tools are available in the market that can helps to calculate the crc sha value in Operating System. The previous versions of 7-Zip file did support the calculation of CRC-SHA value but the process was not that straight-forward.
But with the latest version of 7-Zip, the calculation of these hash values has become much easier.
And so the CRC and Sha entry is quite helpful, but not many users think of it as an asset.
If you too don’t use this feature at all and do not want these two components in your Menu, then you can remove it.
How to Remove CRC-SHA from Context Menu
Many of you would be finding this entry in your Context menu unwanted. And so even after reading the crc sha wiki, you want to remove it then you can follow this four-step process. With this process, you can remove CRC-SHA from Context menu in Windows 10. It is the only and the simplest way to do it.
Step 1: Click on the Search bar, next to the Windows icon on the screen. Type 7-Zip and click on the file from the Search results displayed.

Step 2: In the window that opens, click on Tools option. Then click on Options from the sub-menu.

Step 3: The options window will open. Click on the 7-Zip tab. There will be a list of Context Menu items.
Step 4: Uncheck the box against the CRC-SHA option. Click on Apply and exit the window by pressing Ok.

Note- A dialog box will pop-up with a warning message saying- “An event was unable to invoke any of the subscribers.” Just hit the Ok option. This will Remove/Hide CRC-SHA from the context menu.

Conclusion
So, people, this was all about crc sha algorithm and how to get rid of crc sha. If you are not a developer then you might not know how to use CRC-SHA, and so it is better you remove it.
We hope that this method will help you in removing the unwanted entries. In case of any further query or suggestion, hit the comments section below.