Fast User Switching is the feature of the Windows operating system which offers to share a single computer system between multiple users. Windows XP, Vista, Windows 7 and above all the operating systems provide this feature. Here in this article, we are going to share How to Disable Fast User Switching Windows 10.
What is Fast User Switching?
Fast User Switching is a useful feature provided by windows to its users. It allows more than one users to use a system simultaneously.to understand this let’s take an example, suppose User A is currently logged on the system doing some work, now User B wants to use the system to watch a movie. So user B can use the system to watch a movie and user A didn’t have to close his work and logged off of the system. Once user B finishes his work, User A can return to his session where all his programs are still be running.
How to Switch User?
To switch user in your Windows operating system follow the given process:
Step 1: Click on the start button while you are logged in to your account.
Step 2: Click on the button with the small arrow sign on it next to shut down, to expand the menu.
Step 3: Click on the switch user option.
Step 4: Now a login screen will appear from where you can log in with the Username and Password you want to log in.
The first account will be running in the background when you are accessing the second account. Once you completed your work log out with this account and you will see all your programs are still running.
This feature is introduced to help users, by using this user can share a single system with multiple users.
Sometimes this feature also creates problems for the user, so in case if users didn’t want you this feature, they can disable fast user switching windows 10 home anytime. If you don’t know how to disable fast user switching windows 10 home, so don’t worry we are here providing you methods by using which you can disable fast user switching windows 10.
How to disable fast user switching windows 10
There are two methods of using which you can disable fast user switching windows 10.
Here we are explaining both the methods in detail you can use any method to disable fast user switching windows 10.
Method 1 – Disabling Fast User Switching by Group Policy
This is the simplest method in Windows 10 disables fast user switching. We use the local Group Policy Editor. To that follow the given procedure.
Step 1: Open Run dialogue box on your device. You can open the Run dialogue box by pressing the Windows key+ R key.
Step 2: In the Run dialogue box type “gpedit.msc”.
Step 3: Click the Ok button, for opening the Local Group Policy Editor.
Step 4: Open Configuration from there.
Step 5: From configuration select Administrative Templates.
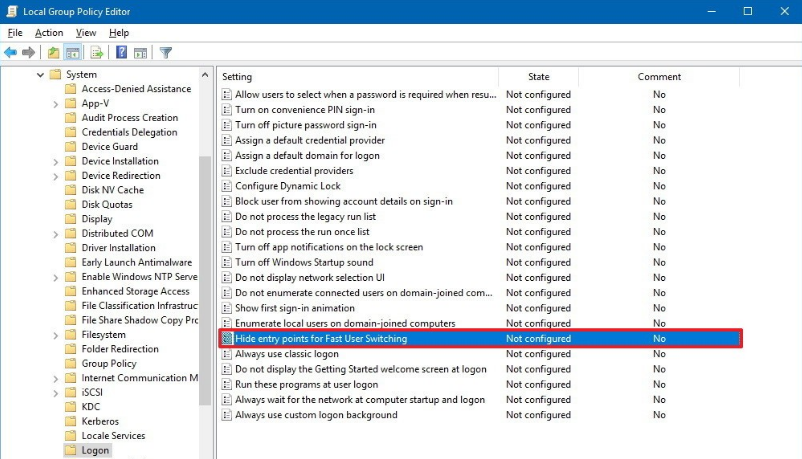
Step 6: Click on the System and then click on Logon.
Step 7: On the right side of windows, you will see Hide entry points for Fast User Switching policy option, open it by double-clicking on it.

Step 8: From that setting Window select Enabled option.

Step 9: Click on the Apply button, for making the changes you have done.
Step 10: Click on the OK button to save the changes.
Once you have made all the changes restart your system. After restarting you will see the Switch user option will no show longer there.
That means you have successfully disabled fast user switching windows 10 from your device.
Anytime if you need to enable the Switch user feature, you can do it by following the above process, but in step8 select Not Configured option there.
Method 2 – Windows 10 disable fast user switching using Registry
If you want to disable the Switch user function from your Windows 10 device, then you can use this method of editing system Registry file. An easy way to windows 10 disables fast user switching! In this method, we will make some changes in the system registry file. But one thing you always keep in mind that editing the registry file is risky, and it can cause some damage to the installation if you didn’t do it properly. So we suggest you take a full backup of your data before making any changes in the system registry file.
To disable fast user switching windows 10 using the System registry file, and to get the answer of how do I disable fast user switching in Windows 10, follow these steps.
Step 1: Open Run dialogue box on your device. You can open the Run dialogue box by pressing Windows key+ R key
Step 2: In the Run dialogue box type “regedit.”
Step 3: To open registry file click OK.
Step 4: Go to HKEY_LOCAL_MACHINE.
Step 5: From there select SOFTWARE, after that Microsoft and then Windows.
Step 6: From Windows go to CurrentVersion, after that policy and then select system.
Step 7: On the system option from the side of the window, right-click on that.
Step 8: After right-clicking on system option select new and from there DWORD (32-bit) Value.

Step 9: On the name box type HideFastSwitching, to name the key.
Step 10: Now press Enter key.
Step 11: Now to open this newly created DWORD double click on this.
Step 12: Set value 0 to 1 there.

Step 13: Click on the OK button to save changes.
After completing all the above steps reboot your device and see now switch user option is not there. That means for windows 10 disable fast user switching successfully.
In any case, if you want to enable this feature to follow the given process but in step 12 set the value of HideFastSwitching from 1 to 0. Or you can simply delete HideFastSwitching to remove it by right-clicking on it.
I hope the above-explained methods works for you to windows 10 disable fast user switching. In this article, we have tried to answer all your questions on windows 10 how to disable fast user switching.
If you have any issues regarding these methods write in the comment section, we are always there to help you guys!!
Thanks for Reading. 🙂