RAM is a volatile memory stored on the motherboard on which the operating system of the computer resides. One kind of RAM, known as Video RAM or VRAM plays a crucial role in storing information that a GPU needs. It is a special type of memory that buffers the hight quality display to your system.
VRAM is designed in such a way to fulfil high graphics requirements in a system. To ensure seamless GUI experience, you must have a sufficient VRAM. If not, it may cause your system to use standard RAM and thus lead to lower frame rate, texture pop-ups, etc.
Here’s how to increase VRAM on Windows PC to ensure a fast rendering of graphical data.
Increase VRAM on your Windows
You can increase your dedicated VRAM on Windows 10 from BIOS. Just follow these steps.
Step 1: Reboot the Windows 10 system and press the BIOS key.
Step 2: Now in the BIOS menu, go to Advanced Features.
Step 3: Next click video/graphics settings or VGA share memory size.
Step 4: The default memory allocation is 128 MB and you can adjust it as per your need. You can go for 256 MB or 512 MB.
Step 5: Finally save the changes and you are good to go.
Can I increase VRAM on a laptop?
Yes, you can increase VRAM on a laptop. You can follow the steps given above to do so. But first, you should know the amount of RAM on your graphics card. To do so, follow these steps.

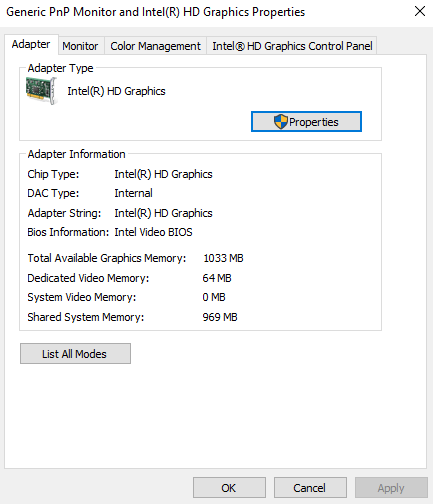
- Go to the Windows Start menu and at the bottom click Display adapter properties.
- In the displayed window, you can see the adapter type and all other graphics information of your laptop.
- Check the total amount of allocated space under Adapter Information.
How can I add more VRAM to Intel HD graphics?
The BIOS method mentioned above doesn’t work out for all the systems. So you require an alternate method to increase VRAM on your Windows 10. If you have an Intel HD Graphics card, this method is best for you. Simply go through this stepwise instructions to add more VRAM to Intel HD graphics.
Step 1: Open Run window and type Regedit.
Step 2: Next, navigate to the following path–
HKEY_LOCAL_MACHINE/Software/Intel
Step 3: Right-click Intel folder. Select New and click on the key as GMM.

Step 4: Now choose the new GMM folder.
Step 5: Right-click on the blank space in the right panel and choose New from the drop-down.

Step 6: Select Dword (32-bit) and rename it to DedicatedSegmentSize.
Step 7: Choose the Decimal radio button option and enter a value data as per the amount of memory you like to allocate, for example, 222. But type the number between 0 to 512.

Step 8: Press OK to save changes and reboot the system.
These are all working solutions to increase VRAM on your Windows 10. If you need any help then comment below.