Screenshots are becoming a part of our digital life. This can be for using it to show it as a how to do it for someone. Or just to save a picture that you like and have no option to do it. Microsoft has announced its latest Windows release. Here is how you take screenshot in Windows 11 easily.
You will need to take screenshots for an awful lot of reasons. Don’t you worry because capturing screenshots in Windows is one of the easiest things to do. There are some different methods that you can follow. But it will lead back to the same thing. So let us take a quick look at all the methods.
Methods To Take Screenshot In Windows 11
All the methods are similar. The difference between them is how much area does it cover in the screenshot and if it saves them or not.
Method 1 – The Print Screen Button

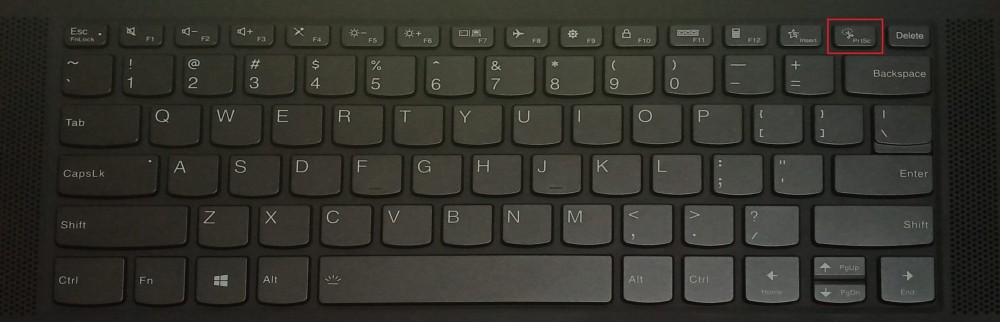
When you hear about taking a screenshot on your computer the first thing to come to your mind is the print screen key on your keyboard. This is the simplest form of taking a screenshot on your Windows PC. Just click the key. It will then capture your entire screen and copy it to your clipboard. You can then use it to paste your screenshot wherever you want. You can even directly select it to open the picture and save it.
Method 2 – Alt And Print Screen Key

This is a slightly modified version of pressing only the print screen key. Unlike the print screen key, pressing Alt + PrtSc together will capture only the active window. However, this key will also not save your screenshot automatically. You will have to go to the screenshot and save it manually. The screenshot will be copied to the clipboard. So, you can directly paste the picture where ever you need it. The shortcut key to paste it is Ctrl + V.
Method 3 – Windows And Print Screen Key

Pressing Windows and Print Screen keys together will automatically save your screenshots. You can then find this file in the Screenshots folder under pictures. This method best helps when you are not going to use your screenshot immediately. You can save it in this way and use them later easily. However, this will save your entire screen in this process. Pressing Windows, Alt, and Print Screen keys together will automatically save a screenshot of only the active window. So, this is the easiest way to save your screenshot for later without having to work for it.
Snipping Tool And Snip And Sketch Tool To Take Screenshots In Windows 11
Both Snipping tool, and Snip and Sketch tool are quite similar to each other. The only difference is you can edit and sketch the screenshot captured in the Snip and Sketch tool. Whereas the snipping tool allows you to only capture a screenshot on the Windows 11 PC.
I will explain both of them very quickly:
Method 4 – Using The Snipping Tool To Take Screenshot In Windows 11
The snipping tool, as I said before, helps you to snip your screen. What makes it different from the print screen key is that it gives you a lot of different options to take a screenshot in Windows 11. Here is how you can open the Snipping Tool.
Step-1: Open your startup menu. There search for the Snipping tool and open it.

Step-2: This will open the snip tool app as a small window.

Step-3: The top section of the window will contain many options. First, let us see the mode option. It contains four modes.

The first mode is the Free-form snip. In this mode, you can draw a random shape. The contents inside that shape will be collected as a screenshot. This is very useful when you want to take a screenshot of only that object. And you don’t want your screenshot to be in the regular rectangle or square shape.

The second mode is the Rectangular snip. In this mode, you drag a rectangle on what you want to take a screenshot of. This is a more formal type of taking a screenshot. The screenshot will look very neat and formal. This is the most preferred type while taking a screenshot.

The third mode is the window snip. This works in the exact same way as the Alt and Print Screen method. The fourth mode is the Full-Screen snip. This mode is the same as pressing just the print screen key to get the screenshot of the entire screen.
Step-4: With the delay option you can decide when it has to take the screenshot. Using this option will help you to adjust the snip path you created to the exact place you want before capturing. You can set the delay up to 5 seconds.

Method 5 – Using Snip And Sketch Tool To Take Screenshot In Windows 11
The snip and sketch tool is a slightly advanced version of the snipping tool. With this tool, you can delay taking your screenshot up to 10 seconds. This has the same four modes as the snipping tool.
The additional part of this tool is the sketching and editing options. You can crop, draw and write on the screenshots using this tool. These options come in very useful when you are taking screenshots to explain something. You can easily mark and show what you want them to see.
Here are some quick steps to open and use this tool.
Step-1: Open your startup menu and search for the Snip and Sketch app.

Step-2: Open the app. You will go into the app window. Select the new option. This will go to the current screen you are on.

Step-3: Now on the top of the screen you will see four options. They are the modes that you saw in the snipping tool. Choose which mode you want and then take the screenshot.
Step-4: This will open this snip in the app where you can edit and save it. The drop-down arrow near the new option contains the delay option. Choose it to take a delayed screenshot.
You can take screenshots without actually pulling up the app from start. Just use the Windows + Shift + S keys. This is the keyboard shortcut for using this app.
Conclusion
These are the different ways to take a screenshot in Windows 11. Choose a method that you feel the easiest and most comfortable with. All the methods are very easy to handle. If you know any other way to take a screenshot easily on Windows 11, do leave it in the comments.