If you’ve ever wondered How to Take a Screenshot in Windows 11, you’re not the first. Screenshot technology is one that’s been around since the 1960s. We have all used it at some point in our mobile phones – either to capture and share an interesting conversation with your friend to another friend, or perhaps to save a hilarious meme you found online.
Most mobile phone users would be adept at using this feature – it’s as simple as holding the lock button and home button together (sometimes even just swiping the screen on newer models). But some of you might be wanting to do the same on your personal computers or laptops running on Windows 11.
Well, I’m here to tell you that the process of taking a screenshot is just as simple on a computer as it is on a mobile phone. Windows 11, similar to its predecessors, offers built-in screenshot features for your convenience.
In this guide, I have mentioned quite a few ways with which you can take a screenshot in your system. They are extremely simple and easy to understand, so do not worry!

How to Take a Screenshot in Windows 11 – Best Ways
Before I begin the guide, let’s take a look at what a screenshot is. A screenshot (also called a screengrab or screen capture), is an image that displays the contents of a computer screen. Screenshots help you capture exactly what is present there on your screen, and saves it so that it can be viewed at a later time or even shared with others.
Here are the various methods on How to Take a Screenshot in Windows 11.
Print Screen Key (PrtSc)
This is the easiest and most convenient method to take a screenshot on your PC. Every keyboard has a dedicated “Print Screen” button that is designed to work in tandem with the Windows operating system. Pressing this key immediately takes a snapshot of the display at the time, and copies it to the clipboard. You can then paste this image onto another application and save it to your computer.
Steps to use the Print Screen Key:
Step 1: The Print Screen Key is located at the top row (right side) on most keyboards. “PrtSc” will be written on the button.

Step 2: Click the “PrtSc” button, and the system will take a screenshot of your full display exactly as you see on your monitor.
Step 3: Now you need to paste this image to another application such as Paint or MS Word (I often use Paint, and would advise the same). Open the application and press Ctrl + V to paste the image.
Step 4: On Paint, you can select the desired location to save the image, and even choose the output formats such as JPEG, PNG, or BMP.
Step 5: Few computers and laptops have a Function Key, which needs to be pressed along with the Print Screen key, in order to take a screenshot. Press “Fn + PrtScn” in these scenarios.

Taking Screenshot of an Active Window
Sometimes you might have multiple applications open and would like to take a screenshot of only one of them. In these cases, this shortcut is extremely useful.
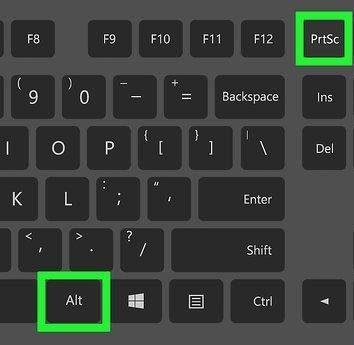
Step 1: Select the application that you want to take a screenshot of and press Alt + PrtSc.

Step 2: This will capture an image of only the active window, and ignore the rest of the screen.
Step 3: Paste this image onto Paint using Ctrl + V, and then save the image to your PC.
Taking Instantaneous Screenshots in Windows 11
Sometimes you might feel it’s cumbersome to keep pasting images onto a different application and then having to save it again in order to get a screenshot. If you’re someone like me who prefers saving time, I have just the solution for you.
Step 1: Once you have the desired screen open for which you need the screenshot, press Windows Key + PrtSc.

Step 2: Your screen will dim for a fraction of a second, indicating that the screenshot has been taken and saved to your PC.
Step 3: Go to This PC (found on the desktop) > Pictures > Screenshots to find your saved screenshot.
Snipping Tool
Windows 11 has a custom-built program called “Snipping Tool” which is used to capture screenshots and save them without having to use a third-party application. This program is especially useful for new users who are just learning How to take Screenshot in Windows 11.

Step 1: Open Start Menu and search for “Snipping Tool”.
Step 2: Click on the application (it will have the icon of scissors and an oval piece of paper) to open it.
Step 3: You will see many options here. In the menu called “Mode”, you can select the shape in which you want the screenshot to be. The rectangle is the default.
Step 4: Now select “New”, and it will change your mouse icon to a crosshair. Click and drag to select the area which you want to take a snapshot of. It will show up in the Snipping Tool window.
Step 5: You can click File < Save As and then save the screenshot to your desired folder. You can also click Ctrl + C to copy the screenshot if you want to paste it onto another application.
Screenshotting with Xbox Game Bar
Xbox Game Bar is an in-built overlay into the Windows system, particularly designed for gamers. However, its screenshotting features can be used without trouble even for new users.
Step 1: Press Windows Key + G to bring up the Xbox Game Bar.
Step 2: On the top left corner, you will see a menu. Press the first icon in that menu (which will be a camera icon). This immediately takes a screenshot of your current screen.

Step 3: To view the screenshot, go to This PC < Videos < Captures.
Conclusion
These are just some of the easiest methods for users who wish to learn How to Take Screenshot in Windows 11. If you’re a little more tech-savvy, there are a lot of third-party applications you can download to get the job done. Apps such as Greenshot, PicPick, and Screenpresso are excellent for taking screenshots and they provide a wide variety of features at your disposal.
Please let us know in the comment section below which of these methods are your go-to for screenshotting. If you know of any other easy tools on How to Take Screenshots in Windows 11, do let us know that as well.
You can also check out our other articles for more tech-related guides, shortcuts, and other useful hacks!
