Sometimes you plug in your headphones into your computer to watch a movie, listen to some music, or get through some video calls. Still, unfortunately, you stuck into an issue: Headphones Jack Not Working into your computer.
Issues with sound, especially with headphones not detected in windows is a commonly reported problem by the users that they can’t hear anything through their headphones even their headphones are working correctly.
Possible reasons for Headphones Jack Not Working
There are some possible reasons for the issue “headphones not detected”, which are mentioned below:
The most common issue possible for this problem could be the damaged wire of headphones and the headphone jack maybe not working.
Sometimes the issue is caused by an improper sound setting on your computer. So changing the setting can usually solve this issue.
Sometimes the issue also occurs when you have enabled both headphones and internal speakers at the same time. Turning off the internal speaker can solve this issue.
Outdated drivers into your computer can also cause this issue. Most of the time, you can solve this issue just by installing and updating drivers into your computer.
Methods to Fix Headphones Jack Not Working Issue
Fortunately, there are a few different ways available to figure out how to fix earphones not distinguished in Windows.
Solution 1: Restart your computer
Most of the time, just restarting your device can solve most of your problems. Plugin your headphones and restart your computer. If restarting your computer doesn’t help, try other options below.
Solution 2: Enable playback device
If your headphones are disabled as a playback device in your operating system, enabling it can also solve this issue.
Follow the steps to enable it:
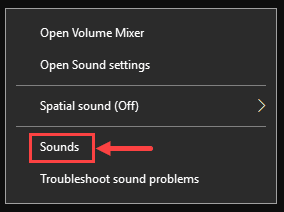
Step 1: Connect your headphones into your computer. In the notification area right-click on the speaker icon and select sound.

Step 2: Right-click and choose Show Disabled Devices. (Only if your device is not showing)

Step 3: Select your headphones and Enable it. Save changes by clicking, OK.
Solution 3: Set your headphone as default device
Windows may not allow your headphone to play if it is not set as default, to set your headphones as a default device follow the following steps.
Step 1: Press Windows and X key at the same time and then select the control panel.

Step 2: Change your view of category and Select the Hardware and Sound option.

Step 3: Select Sound.

Step 4: Select your headphones as default on the playback tab.

Solution 4: Update drivers
Some times this issue occurs because of the old version of drivers, you can also fix this issue by updating your drivers.
Step 1: First Download Driver Easy and install it into your computer. Run the application and then select the Scan now button.

Step2: Click on the update all button to update the correct versions of your drivers.

Solution 5: Realtek HD Audio manager setting
If your Realtek HD Audio Manager isn’t configured correctly, it may not allow your headphones to work perfectly.
Step 1: First, open the Realtek HD Audio Manager and Select the yellow icon from the upper right corner.

Step 2: Check on Disable front panel jack detection.

Solution 6: Uninstall IDT device
Note: This will work only for IDT installed computers.
Step 1: Press Windows and X key at the same time and select control panel.
Step 2: Select Programs and Features.

Step 3: Search IDT audio driver and uninstall it. Restart your computer when done.
Conclusion
If these arrangements on the most proficient method to fix the Headphones not detected in the Windows issue neglect to work, there’s a decent probability that you have a sound driver that is obsolete, undermined, or missing. Further issues like no stable at all may create if the problem goes unnoticed.