No matter what brand of Wi-Fi router you purchase, you will have to install an Extender to expand its coverage. One such Extender is from Linksys. The brand is known for best technology-based routers. But multiple walls and floors, unfortunately, block the connectivity of your Wireless connection. In such case Extenders from Netgear and Linksys comes to the rescue. However, the question of many users is how to to do Linksys Extender setup? So for all those who have got the Linksys Range Extender but are unable to connect it to the system and enjoy its services, this guide is for you. There are different types of Linksys Extender available (RE7000, RE6700, RE6300, RE6400, RE3000W, RE4000W, etc), which helps in the specific type of situations.
So today we are going to discuss how to setup Linksys Range Extender so that you can bring the connectivity back to the dead spots of your house. So let us begin.
How to Install Linksys Wireless Range Extender?
Before you configure the wireless extender, install it correctly. The installation of a Linksys Wi-Fi range extender is important, and then only you will be able to do Linksys extender setup re4100w and other models. Here is the complete procedure-
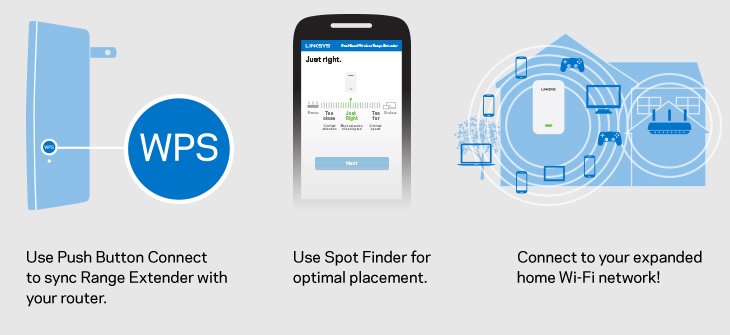
Step 1: Begin with the connection of the power cable. And also check all the antennas connected to the range extender. To get the best signal, keep it in the upright position.
Step 2: Now find a position to place the Extender. You can keep it at a place between the router and the dead zones of your house.

Step 3: After placing it in a suitable position, check the LED lights. Now connect your system to the Extender and open the Linksys Extender Setup.
In case the setup doesn’t start automatically, then browse 192.168.1.1. And then continue the setup of the Linksys Extender with the help of the methods mentioned below.
Linksys Extender Setup Process
You can manually configure and complete the Linksys Extender setup process. This is one long way of Linksys Extender login and configuration. Just follow the steps given.
Method 1- Setup Linksys Wi-Fi Range Extender via Manual Configuration
Step 1: Connect your system to the Wi-Fi extender. You can connect via Ethernet cable also.
Step 2: Now enter 192.168.1.1 as the IP address for the Linksys extender setup. Or you can also browse http://extender.linksys.com.
Step 3: You will now have to give the default login credentials. As the Linksys Extender login process completes successfully, you can access the Extender setup page of Linksys.
Step 4: Now choose the Wireless option. Then click on the basic wireless setting option. There will be a radio button against Manual setup, select it.
Step 5: In case you are configuring the home network, enter SSID name. This is an important step to complete the process of Linksys Extender setup re6700.
Step 6: Now for the Linksys Wireless extender, give the security measures. Enter the password and save the changes you made in the settings.
With this, you will be able to continue with the Linksys Wi-Fi range extender login.
Method 2- Use Wi-Fi Protected Setup to Configure Linksys Range Extender
Apart from the manual configuration, you can also setup Linksys Extender via Wi-Fi/ Wireless Protected Setup. Also, you can connect all your devices while setting up the Extender. Open the Wireless Setup page, and instead of clicking on the radio button against manual, click on Wi-Fi Protected Setup.
Step 1: Then press the Click button. A pop-up will be seen, wait for it.
Step 2: Now press and hold the Wi-Fi Protected Setup button present on your Linksys router.

Step 3: The LED light your router will then become stable when the connectivity takes place.
In case of dual-band router, do this process of Wireless Protected Setup/ WPS twice so as to connect both bands.
How to Reset Linksys Wi-Fi Extender?
With the help of the steps mentioned above, you can easily setup Linksys Extender. But in case you face some problem in login, then browse http://extender.linksys.com as the default web address. Also in case of wrong Linksys Extender setup or you have forgotten the login credentials, then you can use this process to reset Linksys Extender re6300, RE6700, RE6500, RE6400, and other models.
Step 1: Access the Linksys Extender setup re6400/ re6500 by using the web address .
Step 2: Now enter the Linksys Extender default login credentials to access the Extender setup page. If you forgot the credentials, then you can try out the default ones.
Step 3: Then click on the Administrative option. And then choose factory default option.

Step 4: In the next window, click on Management option. Under this, locate the Restore Configuration option and select it.
Step 5: And now save the changes that you made.
How to Check Linksys Connectivity via Command Ping
To set up the Linksys Extender you just need to follow the process mentioned above. After setting up the Linksys Extender you can check the connectivity of the Extender using the Ping Command. The connectivity test is quite simple, but before you perform it to make sure that you have performed the previous steps carefully.
Step 1: Click on the Search bar. Then type Command prompt, and open the desktop app.
Step 2: Now type the command as Ping 192.168.1.1 and press the Enter key.

The replies that follow your command, indicates that your connection is active. So this is how you can check the connectivity on Linksys Extender.

So, guys, this was all about the Linksys Wireless extender setup. We hope that we could help you configure your newly bought router and extender. In case of any query, you can share it in the comment section. We would love to hear your suggestions and thoughts on this article.