Want to improve your study setup?
With portable laptop monitors, you can tap into the power of extra screen real estate and multitasking. You will quickly become even more productive and efficient without making sacrifices in resolution or display quality.
Guaranteed, it’s a win-win, but you can do more with these laptop extenders.
Ready to be amazed?
Here are seven tips for creating an optimal study station with this multi-monitor setup:
1. Brush Up on Cable Management
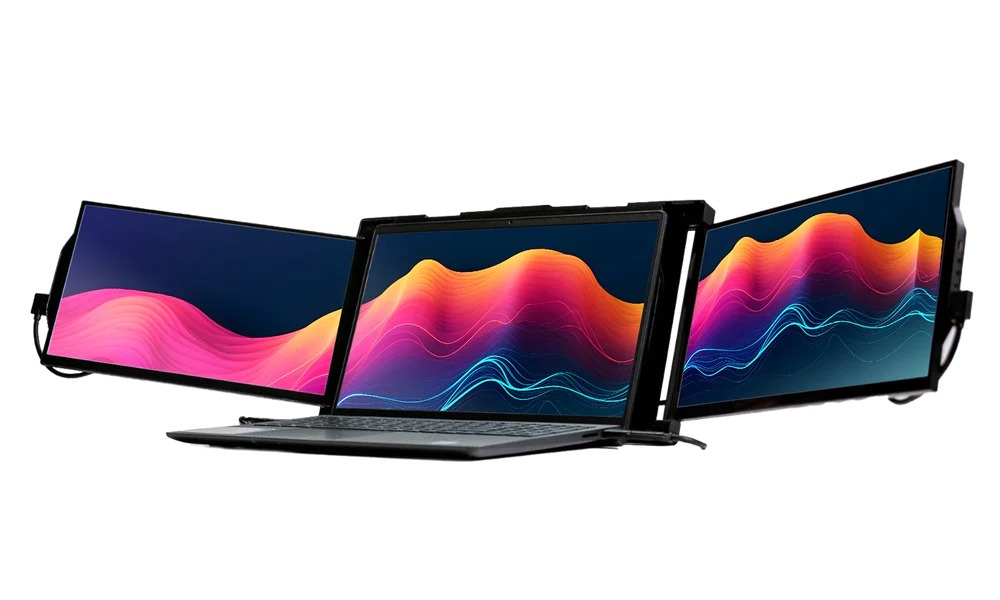
TRIO connects with a single cable to any laptop with a USB-C or USB-A port. However, you’ll need to check whether your graphic cards can do the heavy lifting. If not, there will be inconsistency in resolution and color accuracy, which can be a bother.
But if your laptop is not up to the task, you don’t have to invest in a new one. Instead, you can buy a DisplayPort cable, a docking station, an adapter, or a display splitter for an inexpensive solution. If it creates clutter on and under your desk, some cable management can solve the problem.
While a cable box works well to hide the tangled web of cords, you can bind the cables together with a zip tie, use the loop method to shorten their length without cutting, and use clip organizers to minimize clutter.
2. Learn Keyboard Shortcuts
Granted, portable multi-monitor setups take a lot of hassle out of studying by eliminating the need to toggle between apps, which is .
But this is not where its potential ends.
You can further elevate your productivity and efficiency with keyboard shortcuts to complete your tasks even more quickly.
For example, simply press Win+P to change how your displays are projected. You can keep the project on the PC screen, extend or duplicate it, or display it on spare screens—all with a single command!
There are also some third-party apps you can use to customize these hotkeys.
3. Fix the Cursor Concern
Is your cursor acting weird?
It’s a common glitch in multi-monitor setups. If you keep losing your mouse pointer or if it keeps jumping around, there’s a neat little trick to fix it.
If you’re using Windows:
- Go to settings > devices > Mouse, and select “Additional mouse options.”
- Click Pointer options in Mouse properties, and click on “Show location of pointer when I press the CTRL key.”
If you’re on a macOS device, you can solve the lost cursor problem with the keyboard shortcut Control+Command+1, which will trigger Find My Mouse Cursor. You can also move your mouse from left to right continuously until the cursor grows in size.


4. Focus on Ergonomics
While beneficial to the point of elevating your productivity by a massive 42%, multi-monitor setups are not all sunshine and rainbows.
But that’s normal; good always comes with bad in tech.
What’s not right is just living with it when solutions abound.
If you turn your head too much from reading things left-to-right on your three-screen setup, you can keep muscle strain and shoulder pain at bay with the following:
- Move the laptop screen extenders slightly to the front in a V position.
- Use the built-in kickstand to increase the viewing distance. It’s best to keep it at arm’s length. Also, use zoom controls on your apps to aid your cause.
If you use one screen more than the others, place it right in front of you. Use it to access all of your frequently used apps for maximum convenience.
5. Line Up Your Displays
Suppose your laptop has a higher resolution than your screen extenders.
In that case, you’ll need to adjust “Scale and Layout’ > Change the size of text, apps, and other items to configure how they look on the screens. This will keep the viewing experience as consistent as possible on different-sized screens to ensure a smooth studying experience.
You can also get a more customized experience with “Advanced scaling options” in the same section—you can manually enter the dimensions you prefer.
6. Make Your Monitors Match
You get 250 nits of adjustable brightness on these monitors, which is perfect to use in a suitably lit room and is great for watching videos.
That said, it can be a concern if your main screen has an extra layer of whiteness or brightness. It could completely overshadow the two screens on each side.
Luckily, you can tweak the display settings to match their brightness and color.
7. Play with Taskbar Settings
You likely already know that you can extend your taskbar to your secondary screens, but did you know you could move it permanently? This is an excellent option if you’re bothered by visual clutter and want to maximize usable space.
Here’s how you can do that:
- Select settings > system > display
- Click on the monitor you want to move the taskbar to, scroll down to multiple displays, then click “Make this my main display”
- Finally, select personalization > taskbar behaviors, and uncheck “Show my taskbar on all displays” to disable the taskbar viewability on your main screen.
- This will make it your primary monitor, which could be inconvenient in some cases. But don’t fret; you can just as easily change your preference in a matter of minutes!
Optimize Your Study Station with Mobile Pixels
These tips will help you personalize your setup and eliminate disruptions and viewing concerns to make learning much more fun.
Get portable monitors at 40% off with our Back-to-School deal. Simply log in to our website anytime between the 14th and 18th of August—no code needed!