Many a time you buy a new device, and you want the data from your old one to be transferred there. If your new device is a mac and your device is a Windows 10, and you would like to know how to migrate data from a Windows 10 system to a Mac, here is the guide for you.
Windows 10 and Mac both are a very different operating system, but nowadays we have many apps that are compatible with both Windows and Mac.
So you can easily Migrate Data From Windows 10 To Mac. There are many ways to transfer Data From Windows 10 To Mac OS.
You can also use SSD drive, which is 10x faster than a traditional hard drive, allow users to transfer files very quickly.
We are sharing some best ways that you can use to Migrate Data From Windows 10 To Mac laptop.
Migrate Data From Windows 10 to Mac
You can migrate data from Windows 10 to Mac by using Migration assistant. Migration Assistant is a utility by Apple Inc. that transfers data, user accounts, computer settings, and apps from one Macintosh computer to another computer, or from a full drive backup.
Things to do before you migrate data from Windows 10 to Mac
- You must know the administrative username and password associated with the PC.
- Both computers should be on the same network with the help of either Ethernet or Wifi.
- You would be required to perform a drive performance check before you run Migration Assistant or the software would not work correctly for you.
To do this, follow the instructions :
- First, click on Start on your PC.
- Then go Run using Win + R.
- You will have to type cmd into the Run window.
- Now press Enter.
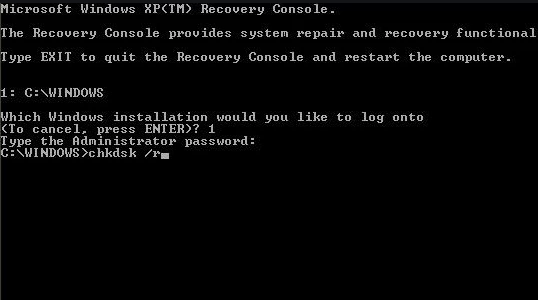
- Then type chkdsk into the Command window.

- Finally, press Enter.
If you discover issues after the drive performance check, you have to run a drive repair process.
- First type chkdsk drive: /F (Change the name “drive” to whatever the name of your Windows startup disk is) into the Command window.
- Then press Enter.
- Press Y when prompted.
- Now restart your PC.
You have to continue repeating the steps above till drive performance check detects zero problems. You can then use the Migration Assistant to move your data from your Windows 10 to your Mac.
Also Read:
Steps to migrate your data from your Windows 10 PC to your Mac
You will have to download and install the Windows Migration Assistant to your Windows 10. There are currently three different versions of the Windows Migration Assistant, each for a different version or versions of macOS/OS X.
If you have macOS Mojave, .

If you are having macOS Sierra and High Sierra, .
If you are still running OS X El Capitan or earlier versions of OS X .
- Now once you have installed Windows Migration Assistant is installed on your Windows 10 pc, you can begin the migration
- First, you need to quit any open Windows apps.
- Then just launch Windows Migration Assistant. You will see a welcome screen greeting you
- Now click Continue to begin the process.
- After this, you have to start up your Mac and go to Applications > Utilities and launch the Migration Assistant on the Mac.
- In Migration Assistant on the Mac, you will have to go through several on-screen prompts, and then you will be asked how you would like to transfer your data.
- You must select “From a Windows PC”, then click Continue. When you are prompted, just enter the administrator name and password.
- After that, click Continue, and you will see all other open apps getting closed.
- A list of available computers will appear on the migration window on the Mac.
- Choose your Windows 10 PC from this list and then wait for the PC to show you a passcode. The Mac will show the same password as well, and you have to click Continue on both the Mac and PC.
- Now the Mac will scan all the drives of the PC and present a list of information you might want to migrate.
- After the scan is done, choose the data you want to migrate to the Mac, then click Continue.
- The data will be moved to the Mac, and you will be shown a progress bar and estimated time of the migration process.
When the data migration is complete, just quit Windows Migration Assistant on the Windows 10 PC and then log into the new user account on your Mac. You will have to set a password for your new Mac account.
When the migration is done, do a fast verification of the user’s most typical applications and files. Once it is complete, click Done. Once it is complete, reboot your computer, and check to see if everything works.
What kind of Data can you migrate and where will it migrate from Windows 10 to Mac?
- You can migrate your calendar, and contacts will migrate to Outlook Mac.
- Your Photos will be migrated to your Mac’s Home folder-
- If you were a user of Windows Live Mail or Windows Mail on your Windows 10 PC, all you IMAP and POP settings and messages will move to the Mac Mail app. For Windows Mail, “People” move to the Mac Contacts app.
- If you had any bookmarks saved for Internet Explorer, and Firefox on Windows 10 PC those will be transferred to Safari on your Mac.
- Any iTunes content whether it is music, movies, and other files that you had on the Windows version of iTunes is transferred to iTunes on the Mac.
- You will also see some system settings from the PC get migrated to System Preferences —location settings and language, custom desktop pictures and web browser home page, and
Final Thoughts
Migrating data from Windows 10 to Mac is easy. Migration Assistant gives you all the necessary tools you need for a user-friendly, convenient and free way of managing data transfer. Here’s hoping this guide helped to migrate your data from Windows 10 to Mac.