
Whether it is for personal or business purpose, printers by the Brother’s is known for its service. Brother is quite a popular manufacturer for both wired and wireless printers. With the advent of technology, the latter are in demand. With the help of Wireless or Wi-Fi printers, you can print any document that is saved on your system from any other room or any other place in the building. But setting up wireless printers is different than the regular ones. And so today we are going to discuss the Brother Wireless printer setup process. To set up your Brother printer, its connection to the local network and driver installation is important.
Apart from this, you also need to follow a protocol. Check out how to connect Brother wireless printer and its setup details.
How to Connect Brother Printer to Wireless Network?
To set up the Brother printer, you need to keep it connected to the network through an Ethernet cable. Here is how you can complete the process in a few steps.
Step 1: Firstly, with the help of Ethernet cable connect your router and the printer.
Step 2: Then insert the Brother Software CD into the system. And run the program.
Step 3: Then click on Wireless Setup and Driver Install, followed by Step by Step Install.
Step 4: Now click on With Cable option. And then just go Next> Next.
Step 5: Now you will get a list of Available Network Devices. Select the option which starts with BRN.
Step 6: Choose the desired Wireless Network.
That’s it. And if asked you can also enter the security type of Wireless Network and the password.
How to Connect Brother Printer to Computer?
Sometimes our printer is added to the printer list by default. But in case, Windows doesn’t do it, and you cannot find it in your Printer list, then here is how you can connect it.
Step 1: Open Control Panel of your system. Then click on Hardware and Sound, followed by Device and Printers.
Step 2: Click on Add a Printer. It is usually present at the top right corner of the screen.
Step 3: Then click on “Add a network, wireless or Bluetooth printer.” Now click on Next.
Step 4: Windows will start the scanning process. Once the printer is detected, you can select it, and click on the Next option.
Step 5: There are chances that your printer is not on the list. In that case, you can select “The printer that I want isn’t listed.”
Step 6: Click on “Add a printer using TCP/IP address or hostname.” Click on Next and then just type the Printer’s name or the TCP/IP address. Again click on Next.
Step 7: To find the IP address of your printer, login to the wireless router that you are connected to. Then locate Connected Clients and Devices Connected option.
Step 8: Your printer will be connected, and so you can see the IP address of the Printer.
So with the help of this IP address, you can connect to the printer. Check if the printer is connected and printing as commanded.
How to Reset Wi-Fi Connection on Brother Printer?
To set up your Wireless connection, you will need network name and password. It is usually present at the back of the modem. So follow the steps given below, to reset the Wi-Fi connection on your Brother printer.
Step 1: Open the Control Panel of your system. Then click on the Menu option.
Step 2: With the help of keyboard key, scroll down till Network option. Then click on Ok.
Step 3: Now again using the arrow key, scroll down till Network Reset and hit Enter tab.
Step 4: Use the number 1 key to select Yes option. Then again click the 1 key, to confirm your action.
Step 5: The printer reboot will begin. After it completes, you will be asked to “Setup Wi-Fi.”
Step 6: click on Ok for three times. This will launch the Setup Wizard but will take some time to complete.
Step 7: Now select your Wi-Fi Network, and then enter the password. Choose the Ok option, and press the 1 key.
Step 8: A “Connection Ok” report will be printed automatically indicating that you are connected to Wi-Fi.
How to Connect Brother Printer to Wi-Fi Mac?
So guys, apart from connecting your printer to computers and laptops, people have also searched for ways to connect Brother Printer to Wi-Fi Mac. So here is a complete step-by-step guide by which you can connect the wireless network to your printer.
Step 1: Firstly, turn off the Brother’s printer from the main power connection and unplug it. If the interface cable is also attached, remove it as well.
Step 2: Now select the connection type. Since we are connecting to the Wireless Network-
First, plug the Brother printer into the power outlet. And then turn on the power as well.
Then, set up the device on the network.
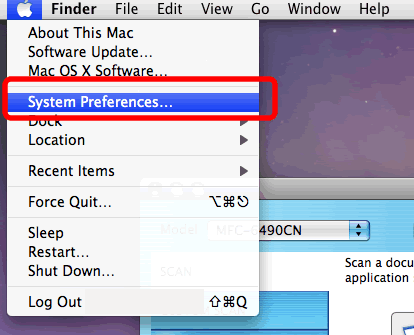
Step 3: Now click on the Apple Menu. And then choose System Preferences.
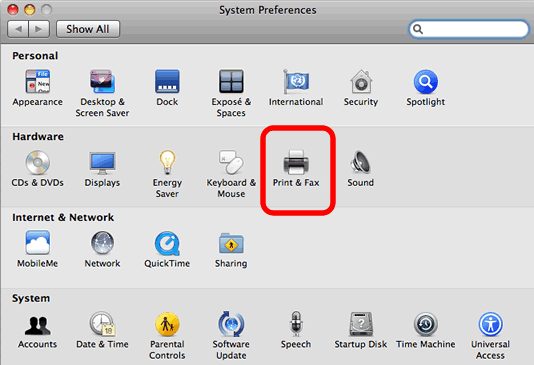
Step 4: In the System Preferences window, click on Print and Fax option or Printers and Scanners or Print and Scan option.
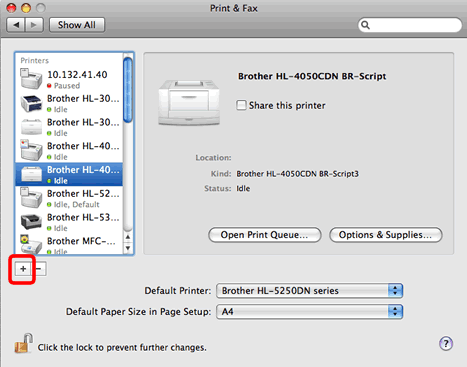
Step 5: Now in the new window, locate the + sign. Click on it.
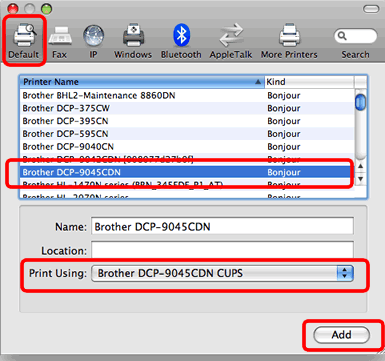
Step 6: Then choose the default option and from the name list, click on your device name. Check if your device name is only displayed against Print Using or Use option.
Step 7: Now click on the Add button.
That’s it. The Brother’s machine will be added to the Print and Scan, Print and fax and Printers and Scanners section. You can now close the System Preferences. So this was the process by which you can connect Brother Printer to Wi-Fi Mac.
Guys, this was all about the Brother Wireless Printer Setup. We have tried to cover every possible query regarding the connection of Brother’s printer to the wireless network. We hope that this article was useful, but if you have any queries, share it with us in the section below.