Logilda.dll error message can occur in various forms across desktop, laptop, and PCs. It mainly happens when there is an incompatibility issue with the Logitech software version. You might come across an error message like There was a problem starting C:/Windows/System32/LogiLDA.dll. The specified module could not be found.
At first, it may seem like an inevitable problem, but it can quickly be resolved with the help of some quick fixes. So today, we are going to mention some approaches that will help you fix Logilda.dll Logitech Mice Error On Windows 10. So without any further delay, let’s get started.
How to Fix Logilda.dll Logitech Mice Error On Windows 10
The following methods will help you fix Logilda.dll Logitech Mice Error On Windows 10 in the best possible manner.
Method 1: Reinstall Logitech drivers
The primary method to fix Logilda.dll error is to reinstall Logitech drivers. To do so, you need first to uninstall and install it again.
Uninstall:
- Press Windows + X keys and then select Device Manager.
- From the displayed list, look for option mice and other pointing devices and choose the option to uninstall.
- You will see an option to delete the driver software for this device.
- Follow on-screen steps to complete the process and reboot the system.
Reinstall:
- Now when the drivers are uninstalled successfully, you need to download them from the website.
- Install them again, and you are good to go.
Recommended:
Method 2: Restore Logilda.dll file
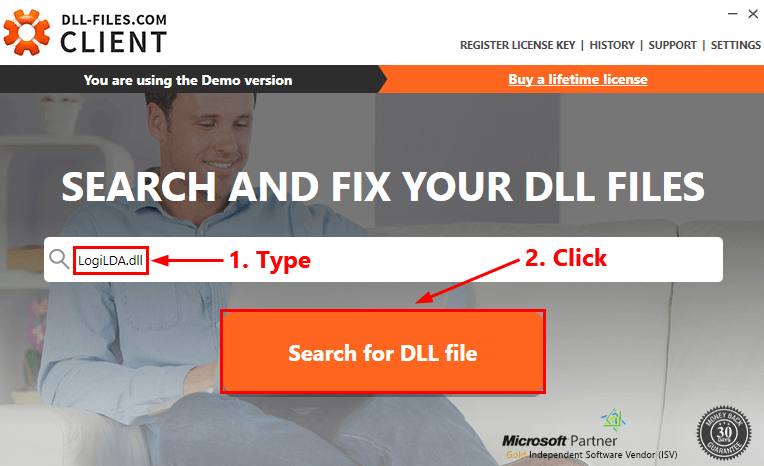
You can also restore the Logilda.dll file to fix the stated issue. There is plenty of third-party software that can be used to restore DLL files. Here are steps for restoring Logilda.dll file with the help of the DLL-files.com Client.
- Firstly download and install this program on your system.
- Run this client and type LogiLDA.dll in the search box.
- Tap search for the dll button.

- Select LogiLDA.dll.

- Hit the install button and follow on-screen steps to complete the process. Check if the issue is solved now.

Method 3: Disable LogiLDA from Startup
Go through the following steps to disable LogiDA from Startup.
- Right-click on TaskBar to open Task Manager.
- Navigate the Startup tab and find LogiDA.
- Right-click on it and choose Disable. It will temporarily disable the Logitech download assistant.

Method 4: Delete Logitech Download Assistant Key from the registry
After following the previous method, it’s useful to finish it with these steps. We need to make it clear that the previous one only resolves the issue temporarily, but when the entire process is done together, you can get rid of the stated error in an extended manner.
- To delete the entry, press Windows + R, and type REGEDIT.

- Next, go to HKEY_LOCAL_MACHINE/Software/Microsoft/Windows/CurrentVersion/Run key.

- Find Logitech Download Assistant and simply remove the entry.

- At last, restart the system for saving the changes.
You can also use Advance system care to fix these all related issues automatically.
The Bottom Line
These are three possible methods to fix the Logilda.dll error. If you are still facing the same issue then comment below.