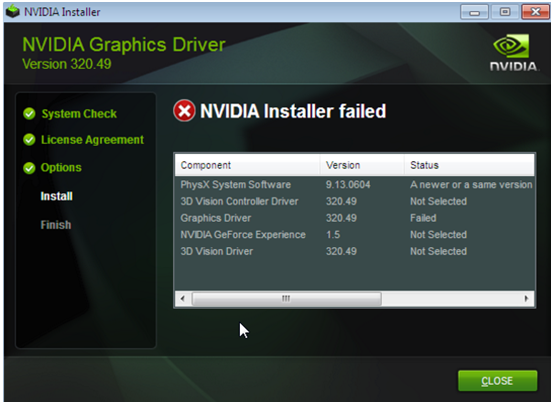
After Upgrading to Windows 10, many users reported experiencing the Nvidia Installer Failed issue. If you too have the same problem, don’t worry; this is a common issue for all Gaming users. In this Guide, we will assist you in fixing the Nvidia Installation Failed error in Windows.
If you are a gamer and playing high-quality games on your Windows PC, you know that Graphic Card is required to play games. NVIDIA is a leading manufacturer of high-end Graphics Cards.
To play games, you have to install Nvidia Graphic Card drivers, but sometimes, while installing Nvidia Card Drivers, you face an Error that Installer is failed. Now without installing the drivers, you cannot play games.
How can we fix NVIDIA Installer failed issue?
Now there are two options. Eighter, you can reinstall the Nvidia driver or update it using the 3rd party driver update tool. Also, you can try to update your Windows OS. Microsoft always recommended users install all the available Windows updates. You can Download new Updates from the Microsoft website.
Also, sometimes Antivirus blocks essential Nvidia services, and thus you can face this issue. So try to disable 3rd Party Antivirus and then try again.

Nvidia Installer Failed
The Nvidia driver installation failed because after upgrading your system, Windows will automatically attempt to download the latest GPU drivers in the background, which generally takes around 5-10 minutes to complete. So, During this process of installing the drivers manually, you experience an installation failed error.
Also Read:
Fix 1: Update the Nvidia Graphics Driver
You can resolve the Nvidia installer failed error by updating the Graphics Driver because mostly incompatible drivers are the reason behind this problem. There are two ways to do it to update the driver, and they are as follows.
1: Update the Driver Automatically
Step 1: Go to this to update the driver automatically. As soon as you go to this page, the website will start scanning automatically, as shown below.

Step 2: After the scanning gets completed, it will show you suggested drivers update or install. Follow them accordingly.
2: Update the Driver Manually
Step 1: Open the Device Manager by pressing Win+X.
Step 2: Find the Display Adapters from the device manager window and expand it.

Step 3: Right-Click on Nvidia Geforce Drivers and select Update driver software.

Step 4: Then the following window appears, choose “Search automatically for updated driver software.”

Step 5: Now, Windows will search online for any updates are available for the driver.

Step 6: If there are any available updates, it will install them or show them like the below image.

Fix 2: Disable All Antivirus Software
According to the Industry experts, the “” error can be caused by the anti-virus software program as it blocks the Nvidia installer to install it properly. So if you installed any anti-virus software like Forticlient, Comodo anti-virus, AVG Antivirus, or any anti-malware program, then better close the software before installing a new NVIDIA graphics driver.
Step-by-Step Procedures for closing the Antivirus Software On Windows 10 are as below:
Step 1: Start “Task manager” (ctrl+shift+Esc).
Step 2: Click the Processes tab. Find all running processes of the anti-viruses software, select them all one by one, and then click “End task” to end the chosen process.


Step 3: Restart your System.
Step 4: Now, try installing the Nvidia driver by performing a clean installation. (you can do so by following the below method.
Fix 3: Perform Clean Installation
To Solve the Nvidia Installer Failed issue, make your system sit idle for 15-20 minutes to ensure that windows have completed downloading and installing all the updates. After that, install the driver again and restart your PC.

Step 1: Download the latest version of the by entering your requirements manually, then you can install the latest version manually.

Step 2: Make sure that the downloaded driver version is compatible with your graphics driver. After downloading the driver close all other programs, including any anti-virus programs (Disable them temporarily) as they may interfere in the installing process of the Nvidia driver.
Step 3: Save the driver only on the desktop. Don’t save it anywhere except on the desktop and run as administrator.

Step 4: The following window pops up, so click on “Run.”

Step 5: After that, choose the destination location and hit OK.

Step 6: Accept terms and conditions by clicking the Agree and Continue button.

Step 7: Now, under the installation options, choose the custom option and click next

Step 8: After that, you will get a list of components, so choose them according to your need. Check the option “Perform a Clean Installation.”

Step 9: After completing the whole process, click on the “Restart now” button. That’s all, now check whether the problem got resolved or not.

Fix 4: Kill All Nvidia Processes
Redundant files in the system also led to the Nvidia driver installation failed issue. So you need to kill all its processes running in the background and remove all the redundant files. To do so, follow the below-mentioned steps:
Step 1: Press “Ctrl+shift+Esc” to start the “Task Manager“. Go to the Processes tab in the task manager and select every process related to Nvidia; right-click and select End task to close the file.


Step 2: Go to ‘C’ folder and remove the following files
C:/windows/system32/DRiverStore/FileRepository/nvdsp.inf file
C:/windows/system32/DRiverStore/FileRepository/nv_lh file
C:/windows/system32/DRiverStore/FileRepository/nvoclock file
C:/Program Files/NVIDIA Corporation/
C:/Program Files(x86)/NVIDIA Corporation/
Step 3: Restart your computer.
Step 4: Now, try reinstalling the Nvidia driver by performing a clean install (custom install).
So this was our small attempt to help you fix the NVIDIA Installer Issue! Write to us if the issue persists. We will be more than happy to help.
