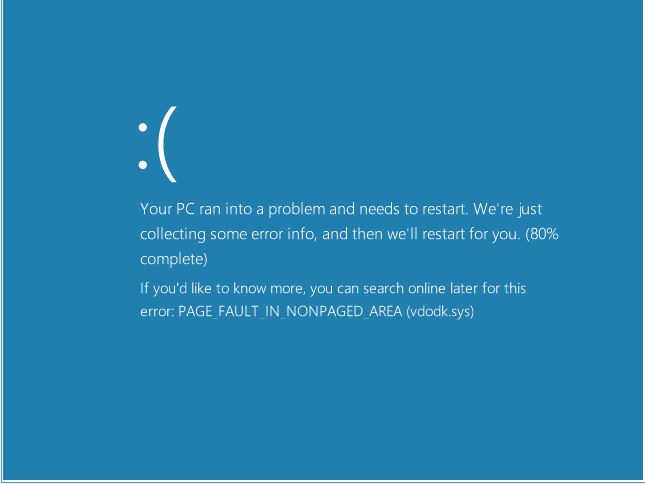
“Your PC ran into a problem and needed to restart. We’re just collecting some error info; then we will restart for you. After updating their device to Windows 10 users have complained about this error which is Fix Page Fault In Nonpaged Area Error which is also known as blue screen of death. Among all the errors page fault in a nonpaged area is the error which irritates most of the window users, that messages when comes on screen, irritates a lot.
What is page fault in nonpaged area?
The meaning of this error is that your PC is looking for a page which is currently not available, to continue its working. If the PC doesn’t find that page it is unable to continue what it was running, and the system crashed, and the screen comes with a blue screen of death.

Fix page fault in nonpaged area windows 10
Blue Screen of Death or BSOD is one of the irritating Windows 10 error. This mistake is experienced by many users and can be repaired but only when the right protocol is followed. You can’t correct the page fault in nonpaged area error by a few clicks. Poor memory, faulty hardware, anti-virus applications are a few of the reasons for this error. After a couple more restarts, the message came back again! After doing some research, I found out that this error message means that Windows is attempting to get a piece of information in memory and it can’t be found. According to Microsoft, this error may be caused by faulty hardware (RAM, hard disk), anti-virus applications, a corrupt NTFS volume or bad drivers.
Fix 1: By Checking Disk
Chkdsk is a Disk Checking utility tool which is provided by Windows and is run on any device to check the hard drive of the device. By running this command on your system you will check if your hard drive is either failing or have some errors because of which it reduces the working of your device. So, to check your hard disk drive follow the given steps:
Step 1: Press Windows key + x and choose Command Prompt (Admin).

Step 2: Now, type chkdsk /f /r and hit Enter

Step 3: When you get a message like below, then Press Y.

Step 4: It displays that System Check will be performed the next time the system restarts.

Step 5: Now, Open Run command (windows key + r) > mdsched.exe.

Step 6: Then Click the option “Restart now and check for problems(recommended)”. By which you PC will restart.

Step 7: Wait for some time (15-20 minutes) to finish the scan.

Step 8: That’s all! Check the problem get resolved or not.
After restarting you will see Disk checking has been started on your device, this process is much faster on Windows 8 and 10.
Fix 2: By Updating Windows
This method is the initial step which you have to take, always make sure to use an up to date version. When users encountered these types of error and complaint about them, so Microsoft releases the extended version by getting which all your problems can be easily solved. So, you also need to update your Windows
If you are also facing the issue page fault in nonpaged area Windows XP, Windows 8 or and don’t have any idea how to check for updates then don’t worry here we will provide methods for all the users.
For Windows 10:
Go to Start menu, Open settings.

Click on Update & Security Option.

Now Click on check for Updates option.

Then windows will start downloading all the necessary updates.

After installing all the updates restart your device.

For Windows 7 or 8:
If you are facing page fault in nonpaged area windows 8 and want to update your windows then below is given the method for you:
Go to Control Panel. Select Security or System and Security Option.

Click on Window Update Option.

Then Click on Check for Updates.

Then Tap on Install Updates, to install them.

After installing all the updated software, restart your device.
Make sure you are using all the updated version of all the software drivers, using that you can enjoy all the new and amazing features.
Also Read:
Fix 3: By Re-creating Page File
To deliver good speed up performance windows uses some disk space on your device’s hard disk, and to do this it creates a page file. By using this page file it delivers full speedy performance to your device.
When you are facing issues like page fault in the nonpaged area then you need to disable the Page File.
To disable the page file to get rid of the page fault in nonpaged area error follow the given steps:
Step 1: Hold Windows key + r to open the Run Dialogue Box.

Step 2: Type “SystemPropertiesAdvanced.exe”, press enter to open it.

Step 3: From the System properties, click on Advanced tab.

Step 4: Uncheck the option which shows – “Automatically manage paging file size for all drives.”

Step 5: From there select no paging file option. Click on Set and then hit OK.

Step 6: Before closing all the tabs click on the OK button of all tabs to save all the modified changes.
Step 7: Restart your system.
After restarting your device repeat all the above steps and again go to virtual memory tab.
Step 8: Now select System managed size from there and Click on the set button.

Step 9: Now, Check the option automatically manage paging file size for all drives.

Step 10: Click on OK of all tabs of every window to save all the changes.
Step 11: Restart your system.
Hope this method works for you and now your device is free from page fault in nonpaged area error.
Also Read:
Fix 4: By removing the Bad Driver
Well if the issue persists, we have to find what’s going wrong. Have you notice recently you have installed or updated some software if yes then here we go. This updated or installed software may be the faulty driver which is causing the blue screen issues in your device. I know what you are thinking that the updating of drivers software is good for every system and is used to fix most of the issues, but sometimes these drivers can cause more issues then they solve.
Here in this excerpt, we will help you deal with this issue, so just relax. We are providing the full detailed method for you, just follow the given steps:
Step 1: Right-Click on the Start Button and open device manager.

Step 2: In the Device Manager window, double-click the recently installed device drivers to expand it.
Step 3: Now Right-click on the listed drivers and select properties.

Step 4: Go to Driver tab and select Rollback Driver.

Pro Tip:
- If you are unable to click on roll back button or you don’t see any option like Roll Back when you right click on the device, then it means that this is the only driver which you have ever installed on your device.
- The only thing you can perform here, in this case, is uninstalling the driver.
- In that Case, Click on the uninstall button.
- Restart the system and check whether the problem got resolved or not.
Step 5: After Clicking Roll back driver, answer why are you rolling back and hit Yes.

Step 6: Now, restart your device so that your system can perform well. And check page fault in nonpaged area error exist or not.
Here we have tried to cover every Fix which helps most of the users, all the above-given methods are simple and easy to perform. We hope all the above-given methods help you out in solving the page fault in nonpaged area error. If you still having some issues then feel free to ask. Write all your queries in the below comment section, we would love to answer all your queries. Thank you for reading.
That’s all for this article.