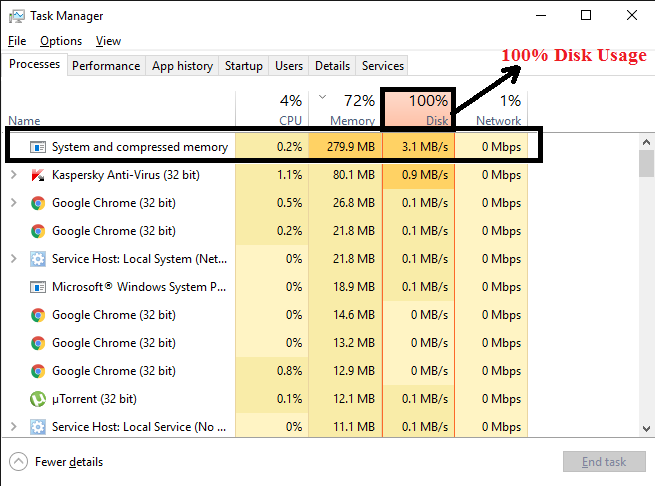
System and compressed memory is a Windows 10 service which is mainly responsible for the Management of RAM and Compression of Files and Folders. Basically, this service is supposed to use less amount of disk but in some cases, this process is taking up to 100% Disk and CPU usage.
This process handles various functions related to System and Memory which helps you to store files in a faster and easier way by compressing and extracting them. But if you are having this 100% Disk usage by the system and compressed memory problem then follow the below-mentioned methods.
Fix System and compressed memory in Windows 10
In Windows, every small service uses a small amount of your CPU power. Now we cannot find each and every service in Windows but there are some important services in Windows that you can see in Task Manager and calculate how much CPU power it is using. System and compressed memory are among the most important Windows 10 service related to Windows RAM process.

METHOD 1 – Optimise your Computer’s Visual Effects for Best Performance
The 100% disk usage by the system and compressed memory process can be minimized by optimizing your computer’s visual effects and animations of the computer. By doing so, this issue will resolve and your system performance will enhance. To optimize your computer’s visual effects follow the below steps:
Step 1: Right-click on the Start Menu button to open the Power Menu.
Step 2: Click on the option “System“.

Step 3: Click on Advanced system settings in the left pane.

Step 4: In the System Properties window, go to the Advanced tab. Under the Performance, box Click on Settings.

Step 5: Click on Adjust for best performance to select it.

Step 6: Click on Apply and then on OK.
Step 7: Close any remaining windows and restart the computer.
When the computer boots up, check to see whether or not the issue has been fixed.
METHOD 2 – Set the Paging File Size back to Automatic
Changing the Paging size to a custom value can create memory compression problems and cause 100% disk usage by a system and compressed memory. so changing the paging size value of all drivers back to default can resolve this issue.
Step 1: Open the Start Menu. And Click on Settings.

Step 2: Search for “performance” from the settings app.

Step 3: Click on Adjust the appearance and performance of Windows.

Step 4: From the Performance Options window, go to the advanced tab. Under the Virtual memory, box Click on Change

Step 5: In the Virtual Memory window, make sure that the box beside Automatically manage paging file size for all drives option is checked.

Step 6: Click on OK.
Step 7: Then a window will pop up saying the changes made require the windows to restart. so click yes and restart the system.
Also Read:
METHOD 3 – Disable the Superfetch service.
Superfetch is a service of windows whose purpose is to maintain and improve system performance. Sometimes, this service is the reason to raise the disk bandwidth to 100% and causing the system and compressed memory high disk usage problem. So disabling this service can fix the problem
The following are the two options that you have when it comes to disabling the Superfetch service:
Disable the Superfetch service from the Services Manager
Step 1: Press the Windows key + R to open a Run Command.
Step 2: Type services.msc and press Enter.

Step 3: In the Services window, scroll down and find the service named Superfetch and Double-click it.

Step 4: Click on Stop.
Step 5: In Superfetch Properties tab, Set the Startup type to Disabled.

Step 6: Click on Apply and then click on OK.
Step 7: Close the Services.
Step 8: Restart your computer.
Disable the Superfetch service using the Registry Editor
Step 1: Press the Windows key + R to open a Run.
Step 2: In the Run command, type regedit and press Enter.

Step 3: In the Window Registry Editor, Go to the left pane, then navigate to the mentioned directory below:
HKEY_LOCAL_MACHINE > SYSTEM >CurrentControlSet> Control > Session Manager > Memory Management.
Step 4: In the left pane of the Registry Editor, under Memory Management click on the Prefetch Parameters subkey to have its contents displayed in the right pane.

Step 5: Now, go to the right pane of the Registry Editor, then find the registry value which is titled as “EnableSuperfetch” and Double-click it to modify.

Step 6: Replace whatever is in the EnableSuperfetch registry value’s Value data field with 0.
Step 7: Click on OK.
Step 8: Close the Registry Editor.
Step 9: Restart your computer.
Once you have disabled the Superfetch service and restarted your computer, wait for the computer to boot up and then check to see whether or not the problem has been resolved.
METHOD 4 – Kill the Speech Runtime Executable
Speech Runtime Executable is a process which handles the functions like audio recording and speech recognition. Sometimes this process is the reason for the high resource consumption of System and compressed memory process. Thus, killing this process can fix the problem.
To do so follow the below-mentioned steps:
Step 1: Press Ctrl + Shift + Esc to launch the Task Manager.
Step 2: In the Processes tab of the Task Manager, locate and click on a process named Speech Runtime Executable to select it.

Step 3: Click on End Task.
If the Speech Run time Executable process was the cause of this issue, you should see the resource consumption of this process go down significantly as soon as you click on End Task, and in case if you find this process “speech run time executable” starting again and causing the problem then my best suggestion is to repeat the above-listed steps to kill it permanently.
METHOD 5 – Change the Configuration of Google Chrome and Skype
System and compressed memory are also caused by a common combination of Skype as well as Google Chrome.

1. Google Chrome
Step 1: In Google Chrome, go to Settings > Show Advanced Settings … > Privacy > Use a prediction service to load pages more quickly and untick or off it as shown in the given figure.

2. Skype
Step 1: Check whether you have exited Skype and it is not running in the taskbar (In case, If this application is running then quit it from the taskbar).
Step 2: Open File Explorer and open the following folder:
“C:/Program Files (x86)/Skype/Phone/”.
Step 3: Now right-click “Skype.exe” file to open properties.
Step 4: Then Click “Properties” and open the “Security” tab. Then click on Edit.

Step 5: Select “ALL APPLICATION PACKAGES” from Group or user names and place a tick in the “Write” box.

Step 6: Then Click on Apply option, After that Click Ok and then click on OK again.
Step 7: That’s all! Now you can check the task manager to check whether it is still utilising the 100% disk usage.

METHOD 6 – Disable the System and compressed memory process altogether
Step 1: Choose Control Panel. Search for Administrative Tools.
Step 2: Choose Task Scheduler.
Step 3: In the Task Scheduler, double-click on Task Schedule Library in the left pane to expand its contents.

Step 4: From the contents, Double-click on Microsoft in the left pane to expand contents.
Step 5: Then Double-click on Windows on the left side to expand it.
Step 6: Now, Click on Memory Diagnostic in the left pane to have its contents displayed in the right pane.
Step 7: From the right pane, find and right-click on a task which is named as RunFullMemoryDiagnosticEntry. Now, From the contextual menu click on Disable.

Step 8: Close the Task Scheduler and restart your computer.
METHOD 7 – Repair Corrupt System Files
Download and run Reimage Plus to scan for corrupt files, if files are found to be corrupt and missing repair them. This will fix the System and Compressed Memory 100% Disk usage issue.
Conclusion
These are some of the best methods to fix the 100% disk usage by system and compressed memory in Windows 10.