Since after the transition of Apple into Intel Processor in the year 2006 Apple Mac can smoothly run both the MacOS and Windows OS and their supporting applications. Yes, that is true Macs that are bought after 2006 can install and run Windows 10 operating system. Although the process of installing Windows 10 in your Mac can prove to be a bit technical, below there is a guide on “How to Install Windows 10 on Mac” below that can ease the process for you.
Install Windows 10 on Mac
You might not have heard, but Windows 10 is a great operating system that worth installing on your Mac PC. All Apple fans don’t have to miss out its featured either since this operating system can be installed with ease on your Mac PC bought after 2006.
System Requirements for Installing Windows 10 on Mac
- Mac PC purchased after the year 2006
- Thumb Drive with over 5GB storage
- Second PC that already runs on Windows 10
- High-Speed Internet Connectivity
PS: You would require Windows 10 License to install the operating system legally after the free trial of 30 days is over and you want to continue with the operating system. The below mentioned steps would help you to install Windows 10 on Mac in Dual-Mode Configuration, this translates that users would have two options where they can switch between MacOS and Windows 10 whenever they feel like.
Part 1 of Installation – Install Windows 10 on Mac
First Step – Insert the flash drive into your Windows PC to download the Windows 10 media creation toolkit from Microsoft. There are two versions – 64-bit and 32-bit, ensure to download the version that is compatible with the Mac PC you are using.

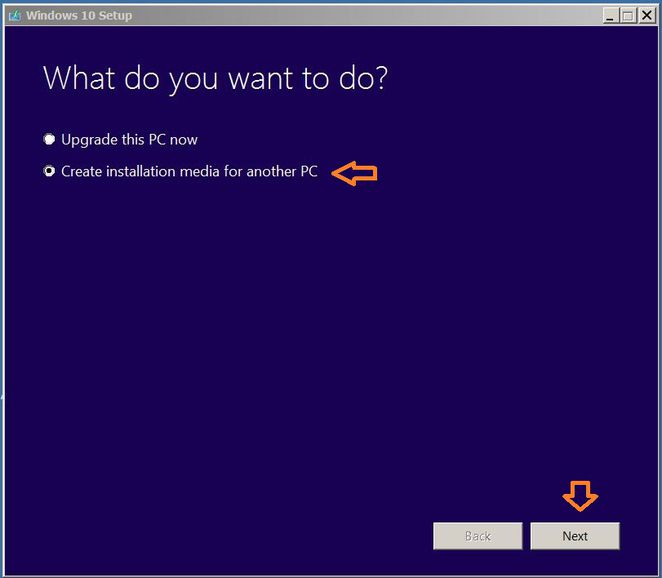
Second Step – Download the media creation tool and choose the Create Installation Media for Another PC and finally click on “Next”

Third Step – Choose Edition, Language and the Architecture type for Windows 10 and click “Next”. For better installation ensure to download the 64-bit version of architecture, unless your Mac supports only 32-bit.

Fourth Step – Save the downloaded Windows 10 installer as ISO File and click “Next”. No DVD Burner or USB Flash Drive option required here or you may require the Windows 10 USB Installer Drive.

- Fifth Step – Choose a location where you want to save the Windows ISO file. You may choose to save in flash drive or anywhere on the computer.
Part 2 – Prepare The Flash Drive and Mac’s Partition
In this part, you may be asked to enter Mac’s admin password so ensure to have the password handy for you.

First Step – Insert the flash drive and launch it on your PC to copy and paste the Windows ISO File on Mac PC. Wait till the files are transferred to the Desktop and ensure that no other external drives are connected to the Mac PC at that time.

Second Step – Run the “Boot Camp Assistant” and click “Next” or “Continue”. The Boot Camp Assistant of your PC will be located in Applications/Utilities folder. Use Spotlight to search it faster

Third Step – Ensure that all the 3 tasks Create a Windows 10, Download Latest Windows Support Software from Apple and Install Windows 10 are checked and finally click the “Continue” button

Fourth Step – After the Windows ISO file is copied to the desktop, verify the files and click “Continue”. The Boot Camp Assistant will confirm and ease the flash drive prior to turning the files into a Windows 10 install disk. So, ensure that the flash drive has no information files stored. The Boot Camp Assistant will also download the latest version of Windows Support Software on flash drive.

- Fifth Step – A prompt window will open asking you to select the size of the partition where the Windows will be stored. Ensure to select the size above 20GB for the partition for smooth installation. Once you are done with the partition size, click “Install” without having to remove the flash drive. The partition will be created and the Mac PC will restart.
Part Three – Installation of Windows 10 on Mac
First Step – The Mac PC will restart and it will boot from the active flash drive and hence the Setup Process of Windows 10 will start. You will be asked to choose Time & Date, Language, and currency format and also the Keyboard Settings for Windows 10. Click “Next” once you are done. If the Mac PC is not booted from a flash drive, then restart it and press the Option key after Apple start-up for all the available boot options. Choose the flash drive for booting and again restart the PC.

Second Step – Now the product key of Windows 10 should be entered and click the “Next” key or “Skip” if you are using the free trial of the Windows 10. The process of installation will start and you need to confirm Windows edition and check the boxes of terms and conditions.

Third Step – All the available partitions will be displayed now including the “BOOTCAMP” which is the partition that will help you install the Windows 10 on Mac PC. Select this option and click “Format”. Leave the remaining partitions as it is.

Fourth Step – You will be asked to “Confirm” and you need to click “OK” and then “Next” button

Fifth Step – The Windows Setup will start along with the other setup process. This may take up to 30 minutes to get complete based on the speed of your Mac PC. Once the setup is completed, the Mac will restart with Windows 10. There are few steps you need to confirm including the step of creating a user account.

Sixth Step – Once you log in for the first time, you will be greeted with Boot Camp Installation message. You simply need to click on “Next” button and follow the remaining installation process, once you are done, reboot the Mac PC.
PS: If you see the prompt window saying “Open the Flash Drive” or “Double Click on the Setup file Inside the Boot Camp Folder”, then simply remove the flash drive from the system as it is no longer required.
Thanks for reading this article!!