A very common question from iPhone users is about devices – and, particularly, how to unlock a disabled iPhone without iTunes coming into the picture. The answer is a complicated one because there are so many different ways to deal with the problem, such as:
- Taking your device to the service center
- Doing a factory reset
- Wiping your phone remotely using Find My iPhone
- Using third-party applications to unlock a disabled iPhone
While all these methods might work, you also need to consider the practical aspects of each of them. For instance, you may not have the time to take your device to an official Apple service center or Genius Bar. Or else, you may have forgotten your Apple ID or iCloud password, and it’s too tedious to reset it just to handle the iPhone disabled issue. In some cases, even third-party applications don’t deliver on their promise and leave you more frustrated than before! However, it suddenly becomes a very simple task if you have the right tool for the iPhone disabled – how to unlock – process. Here’s one such tool that we’re showcasing today: . It is the most reliable and versatile desktop software when it comes to managing your iPhone and doing other tasks.
Dr.Fone – Screen Unlock Permanently Solves the iPhone Disabled Problem
Dr.Fone – Screen Unlock is the preeminent utility of choice when it comes to regaining access to a locked or disabled iPhone. Why? Because it’s simple to use but powerful enough to handle nearly any iPhone issue, including unlocking disabled iPhones and bypassing 4-digit and 6-digit passcodes, Face ID, Screen Time passcodes, and even Touch ID. The application runs on Mac or PC and works with any iOS device running iOS 9.0 or higher. In fact, it even works with the exquisite iPhone 13, iPhone 13 Pro, and iPhone 13 Mini running the powerful iOS 15 under the hood.
So how easy is it to use Dr.Fone – Screen Unlock to restore a disabled iPhone? It’s as simple as 1-2-3, as we’ll see.
How to Unlock a Disabled iPhone without iTunes using Dr.Fone – Screen Unlock
Step 1: Install Dr.Fone on your Computer and Connect the Disabled iPhone

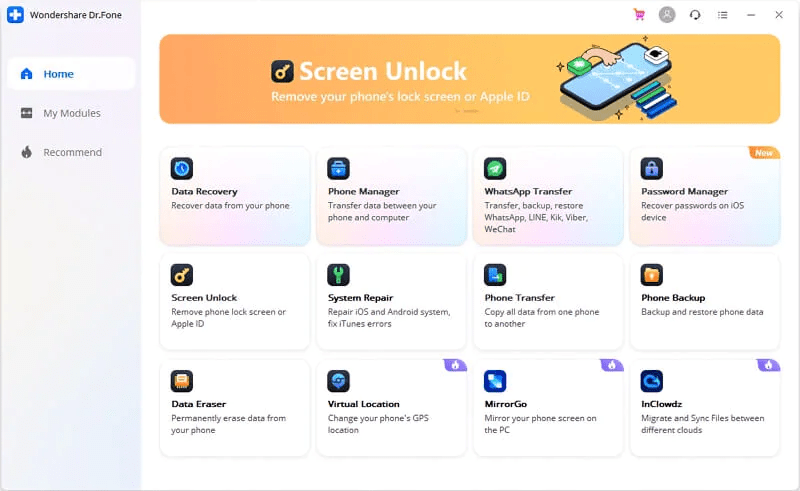
Once you download and install the Dr.Fone application on your Windows PC or Mac computer, click the Screen Unlock module

Next, connect your device to the computer and select the Unlock iOS Screen option
Step 2: Prepare the Disabled iPhone for Recovery and Restoration

Next, take your iPhone into DFU mode to initiate the restoration process – the steps are outlined clearly on your screen so just follow the instructions provided

Check if your iPhone model and iOS version are set correctly displayed and click Start
Step 3: Reliably Unlock your Disabled iPhone and Regain Access

Finally, confirm by clicking on Unlock Now and then on Unlock in the security prompt that appears

Wait for the success message to pop up on your monitor, and then eject and unplug the device
And that’s all you need to do. Dr.Fone – Screen Unlock takes care of the hard part and restores your device to new, just as it was when you unboxed it or set it up for the first time after buying it. This ease-of-use is why Dr.Fone has nearly 4 million users worldwide who rely on its power to fix iPhone disabled and several other issues quickly.
Does Dr.Fone Offer Additional Features?
Absolutely! You may have noticed on the Home screen of Dr.Fone that the Screen Unlock module is just one of many available to you. There are numerous other modules, as listed below:
- WhatsApp transfer
- Data recovery
- Data transfer
- Phone switching
- System repair
- Data eraser
- Password manager
- Phone backup and restore
- Mirror your device to a PC
- Migrate or sync data between multiple cloud storage services
- Spoof your location to prevent IP tracking
With all these tools at your fingertips, you’ll never need to go elsewhere for an iPhone disabled issue or any other requirement you may have as an iPhone user. Why spend hundreds of dollars at the Genius Bar when you can do almost everything they can with just a few clicks of your mouse.
Final Words of Advice
Here are some tips to help you keep your device and your data safe. We hope they’ll be of help to you, and please share them with your friends and family so they can benefit, too.
- Always use security protection such as passcodes or biometric authentication in order to prevent data theft or accidental exposure of sensitive data
- Never leave your device unattended when in public
- Download third-party software only from reliable sources such as Dr.Fone Wondershare – and don’t forget to download ONLY from the official website rather than third-party platforms
- Use Dr.Fone to take regular backups to a local computer and lock the device with a secure and strong password
- Change your iPhone passcode every few months, if not more often, and never use easy-to-guess passcodes such as your date of birth or anything that others will know
- Use Dr.Fone to transfer data when switching phones so 100% of your data is moved to the new device
- If you need to temporarily share your passcode with someone else in case of an emergency, change it immediately after
- Don’t write your passcode down and leave it around where others might see it
- Activate Find My iPhone in case your device is stolen, misplaced, or lost
We hope the information in this article has helped you deal with the infamous iPhone disabled problem or other issues. Dr.Fone is easily available for download on the official Wondershare Dr.Fone website. Try it today, take control over your device, and secure your digital life immediately.
