Netgear routers are used by the majority of people. Netgear routers are exceptionally capable. During the first time configurations for your Netgear WiFi router device, you will need to manage the settings for your Netgear WiFi router device.
You can use this Netgear Wifi Router Setup guide if you have a Netgear router already installed for your location. Make sure that you can manage all these settings for your device because if you get successful in making all these steps, you will definitely get internet connections for all devices installed at your location.
If you are new to Networking then this guide will help you with Netgear Wifi Router Setup and Configuration.
Netgear Wifi Router Setup and Configuration Guide
Selecting a router can be confusing as a result of the wide selection of models and specifications. Once you login to your router, you will be taking a look at the home setup page that has a navigation bar on the left side of the webpage. When you buy a new Netgear router, it’s saved with the default security settings. Setup is easy and the manufacturer also made a helpful video if you would like to setup Netgear Router.
The Netgear router setup procedure is a simple task with the assistance of a sensible setup wizard.
Here are the Steps to Manage the Access Point Settings for your Netgear WiFi Router Devices
Step 1: Connect your computer device with the router device all using the Ethernet cable.
Step 2: After connecting your devices you can provide a power supply to your devices.
Step 3: Launch a web browser and then type or 192.168.0.1 IP Address and log in to your Router with the default username and password.
Step 4: From the Netgear, application window click on the Continue button.
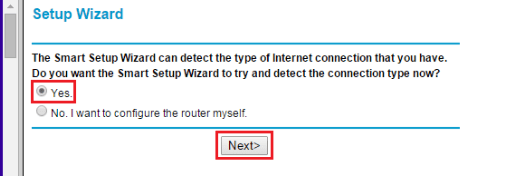
Step 5: Select Yes using the radio button and click on the Next button once again.

Step 6: You can get an IP address dynamically for your device or you can also have a static IP address for your device.
Step 7: Click on the “Next” button.
Step 8: If you want to use a static IP address then make sure to fill IP address, subnet mask, and primary and secondary DNS information for your device.

Step 9: Click on the “Next” button for your device.
Your Netgear WiFi router device is now configured as an access point device so you can have many advanced features with your device. You can place your access point at a location where you want to have more internet connections. You can also get more details for setting up your Netgear WiFi router device from the blog page.
When you install a new Netgear WiFi router device, you will get to know about the settings for your device using the LED status of your device. These status LED lights for your device will make sure that your Netgear Router is working correctly.
Enable or Disable the LED Status on NetGear Router
Here are the Steps to Enable or Disable the LED Status for your Netgear WiFi Router Devices.
Open the web browser and you will get redirected to the Netgear login page and if you are not getting any redirect at all then you can use HTTP:// routerlogin.net or IP Address-192.168.1.1 or 192.168.0.1.
Enter the password and username of your router.
Go for the “Advanced” tab for your device.
There you can easily manage the LED Status for your devices.
Make sure to save the settings for your Netgear WiFi router device.
Using these steps you can easily disable the LED Status lights for your Netgear WiFi router devices and then you can manage the settings.
Thanks for reading this Netgear Wifi Router Setup guide.