Facing Internet problems? Then do not worry as Internet problems are becoming quite common. Internet Protocol’s damaged and corrupted settings are usually a cause behind various such errors. And one of sure shot way to troubleshoot Internet related issues is resetting the settings of TCP/IP. And so if you are not technology pro and are stuck with any issue related to Internet, then this article will give you a brief but really essential information regarding the command netsh winsock reset and how it will help you resolve network issues.
If you want to know more about netsh winsock reset or netsh int ip reset, then it is possible that your Google Chrome is causing trouble. And so here we are sharing how you can use the netsh winsock reset command to reset the TCP/IP stack.
What is Netsh Winsock Reset?
Many of you might have come across the term “netsh winsock reset” while configuring the settings related to Internet. And so to begin with, netsh winsock reset is basically a command prompt program that helps you to reset winsock catalog to the default state or the clean state. In case you are facing any Internet issue or network related problems, then you can use this command. It is the last solution to which you can resort if none other way was helpful in resolving the error.
The command is indeed useful in case of installation of malformed LSP resulting in loss of connectivity. Failing to resolve errors like this, netsh winsock reset command will help you restore the connectivity. But just be careful and don’t forget to reinstall the previously installed LSPs.
Which Problems are Fixed by Netsh Winsock Reset?
The netsh winsock reset command is helpful is resolving a lot of problems related to Internet connectivity and network. Here we are mentioning a few of them, if you too are facing one of them then they will be fixed for sure.
- Network problems that occur after removing spyware, adware, worm, virus, trojan etc.
- Unable to access any webpage or can access only some of the webpages.
- Network connection is lost after installing adware, spyware, VPN or firewall.
- No network connectivity because of registry errors.
- Pop-up error window due to occurrence of network related problem.
- Occurrence of DNS lookup problem.
- Network connectivity problem with no connections messages.
- Fail to renew the IP address of network adapter or some other DHCP errors.
- Or some other networking problems.
How to Execute Netsh Winsock Reset in Windows 10?
The process to perform netsh winsock reset in Windows 10 is easy. Just follow the steps given below-
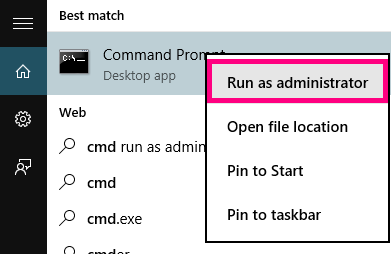
Step 1: Click on the Start button. Then launch the command prompt, by typing “cmd” in the Search bar.
Step 2: Right click on Command Prompt option, and then click on Run as Administrator.

Step 3: Now in the command prompt window type netsh winsock reset. And hit the Enter key.

Step 4: Wait for a few seconds. After the process of resetting completes, a message saying Winsock reset completed successfully will be displayed.
Step 5: To complete the netsh winsock reset catalog, restart your system.
Step 6: Similarly, you can use the command netsh int tcp reset to reset the TCP/IP settings.
How to Execute Netsh Winsock Reset in Windows 8/ 7?
In case you have not updated your system to the latest Operating System and still running on Windows 8.1/8/7, then the given steps will help you execute the command.
Step 1: Open the Menu bar by hovering over your mouse on the right side of the screen. Then click on the search option.
Step 2: Now type “Cmd” and press Enter. The Command prompt window will open.

Step 3: In the new window, type- netsh winsock reset. Press the Enter key.

Step 4: That’s it. The process will take a few seconds and soon you will get a message saying- Winsock reset completed successfully.
Step 5: Restart your system and netsh winsock reset Windows 7 process will complete.
The process is similar in case of windows XP, Vista. Just open the command prompt window accordingly and follow the same steps after it.
Airport Reset in Mac OS
In case you are not Windows user, then the following process will be useful while working on Mac OS. As the latter doesn’t have netsh Winsock feature, you won’t be able to reset it. So for all the Mac users, here are the steps to follow.
Step 1: Locate the Network icon on the top right corner of the screen. Click on it.
Step 2: From the drop-down menu, click on Turn Wi-Fi/Airport Off option. And wait for a few minutes.

Step 3: Now again click on the Network icon. Select the Turn Wi-Fi/Airport On option.

Step 4: In a few minutes for the Wi-Fi/Airport feature to restart. Now try reconnecting to the default network and browse some website.
So guys we hope that now you will be able to use the command netsh winsock reset in windows 10/8/7 to resolve issues related to Internet connectivity or network. If you have any confusion or questions regarding any step, then share it with us in the comment section.