If you are an Apple fan, then you must have heard of QuickTime Player. But if you haven’t then let me tell you something about it. So, the player allows the playback of QuickTime movie files which goes by the extension (.mov) and with many other file formats that include audio, images, graphics and even virtual reality (VR) movies. Basically, just like the company, it is also a fancy player, living up to the standards.
Quicktime For Windows 10
Of course, there is something about the player which is why you are here, wondering how to download it on Windows 10. I took it upon myself to enlist some of the features which put it above par and they are as follows.
- It delivers crisp quality.
- Simple to use and function.
- No set up is required.
- It determines the connection speed of the system that is being and then chooses the highest possible quality stream for the bandwidth that is available.

Don’t worry, it is not as tricky as it seems. We are here to direct you with ways to install the player.
After you are done reading it, you will have a clear idea of how to proceed. So, without any further ado, let us get to it.
Solution 1:
The first solution that you can try is installing an older version of QuickTime such as v7.7.6. but to install the latest QuickTime v7.7.9 for Windows 10, you will receive an alert message which will say that “QuickTime 7 requires that your computer is running Windows Vista or Windows 7.” If that happens then you can opt for QuickTime 7.6 for Windows 10 instead.
Solution 2:
Second solution that we propose is installing the latest QuickTime v7.7.9 for Windows 10. You will be required to download the latest from the official QuickTime for Windows 10 page or you can even google it.
Then open the folder, right click on the .exe file, choose “Exact here.”
But if you can’t extract the installation file then you will have to download and install the WinRAR or 7Zip to have a try.
Now that is one, you will have a folder under C:/QT or whichever folder that you create.
Follow the mentioned steps.
- Double click on the AppleSoftsUpdate.msi file and then click “OK” until the installation finishes.
- You will have to do the same with ApplicationSupport.msi.
- Ignore the file called QuickTimeInstallerAdmin.exe because we will not require.
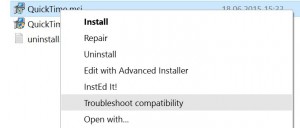
- Right click on the QuickTe.msi file which is inside the folder that you have extracted earlier. Then select “Troubleshoot compatibility.”

- Wait for the wizard to make a scan of the QuickTime.msi file for any possible culprits.
- Click on “Test the program” and from there on run the installation. The installation will get completed when you select “next.”
- Click on “Test the program “and run the installation. Download a TRANFORM file and extract it to the same folder.
- Click the Windows icon or Search icon then search CMD. Type the following and hit enter “msiexec /i QuickTime.msi /qn TRANSFORMS=FIX.mst ALLUSERS=1 /log C:/QT/install.log.”
- That is, it, congratulations won’t take more than couple of minutes.
We hope that this article helped you. Thank you for reading.
