Many of you might be thinking that what Cisco LEAP module exactly is? Many of you might not be knowing that the cisco leap is a WiFi extension protocol. Cisco LEAP module supports strong mutual authentication between the client and the RADIUS server as it is an 802.1X authentication type for the wireless LANs. The authentication between the client and the RADIUS server mostly uses a login password. The Cisco LEAP module also provides encryption keys per session and dynamic per user. The Cisco package includes all Cisco wireless products including Cisco Aironet products and Cisco compatible client devices at no additional costs.
Cisco LEAP module can be installed on Windows XP, Windows Vista, Windows 7, Windows 8, and Windows 10. But what if you want to remove Cisco LEAP Module?
In this article, find out links to download Cisco LEAP Module followed by methods to remove it.
Is it safe to remove the Cisco LEAP module?
If you are not using any Cisco products on your domain network then you can go ahead and delete or remove or uninstall Cisco LEAP module and it won’t cause any problem.
Even if you accidentally remove or delete the Cisco LEAP module from your device it won’t cause any problem. As mentioned above, Cisco leap is a WiFi extension protocol which is not used these days. Cisco LEAP module is largely used in companies or education wireless systems.
So, even if you remove it intentionally or unintentionally it won’t create any problem if you do not use Cisco Leap on your network domain. You can install Cisco LEAP module if you want to use it.
If you want to install Cisco LEAP module on your devices, just follow the mentioned steps for successful installation of the Cisco LEAP module on your devices.
How to Install Cisco LEAP Module?
Follow the steps mentioned below for successful installation of Cisco LEAP module on your devices.
1. Enabling Windows Update
Before starting with the installation of the Cisco LEAP module on your PC, ensure that your Windows is updated. If not, then follow the below-mentioned steps.
Step 1 – Open properties by right-clicking on the My Computer icon.
Step 2 – click on the Advanced system settings.
Step 3 – After clicking on the Advanced System Settings a window will appear. From there, select the Hardware button.
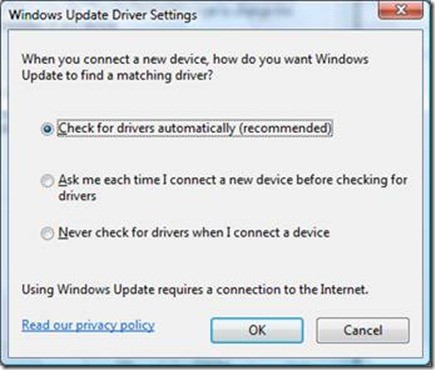
Step 4 – Now, select the Windows Update Driver Settings.
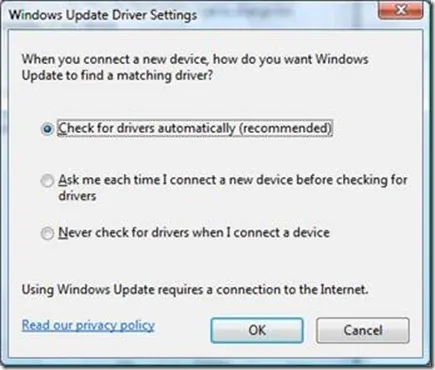
Step 5 – After completing all the above mentioned steps it is recommended to choose “Check for drivers automatically” option.
2. Creating the ECP Node for EAP-FAST
Step 1 – For this, you need to download the Cisco EAP-FAST.reg file. to download.
Step 2 – After downloading, to run the Cisco EAP-FAST.reg file Double-click on it. There is no need to create any registry entries for the EAP-FAST since the reg file will automatically create the relevant registry entries for EAP-FAST.
3. Installing drivers for the ECP Node using Windows Update
Step 1 – After creating the ECP Node for EAP-FAST wait for around 5 or 10 minutes. The ECP node will automatically appear in the Device Manager.
Step 2 – Now, again open Properties by right clicking on My Computer.
Step 3 – Again, choose Device Manager.

Step 4 – The device manager will have an option of ECP Node. Select ECP Node.
Step 5 – Now update the driver by right-clicking the ECP Node.
Step 6 – Now you can install the EAP-FAST on your device after the windows update is finished.
How to Support Cisco LEAP Module?
If you want to support the protocols using the same process then you need to perform a windows deployment to surface devices. To enable the support for Cisco LEAP module or for PEAP, EAP-FAST on your newly deployed surface devices, follow the given steps.
Step 1 – To start the process you first need to download and extract all the installation files for each protocol. It is recommended to extract all the files in separate folders that too on an easily accessible location.
Step 2 – After completing the above step, you need to open the MDT Deployment Workbench. After this, expand your deployment share to the Applications folder.
Step 3 – Now, open Action pane and choose New Application.
Step 4 – Now, you need to copy the MSI files into the deployment share. To do this select the Application with source files.
Step 5 – Select the folder you created in step above.
Step 6 – You now need to name the folder in the deployment share where you will be storing the installation files.
Step 7 – you need to specify the command line to deploy the application. Following are mentioned below.
- EAP-PEAP.msi /qn /norestart – for PEAP
- EAP-LEAP.msi /qn /norestart – For LEAP
- EAP-FAST.msi /qn /norestart – for EAP-FAST
Step 8 – To complete the ‘New Application Wizard’, use the default options.
Step 9 – To complete each desired protocols, repeat steps 3 through 8.
The MSI packages will be available for selection in the Applications page of the windows deployment wizard only when you import all the three MSI packages as applications into the MDT. However, it is not recommended to select each package at the time of deployment during any simple deployment scenarios. It might be possible that a surface device may get deployed without the EAP support due to the human error or the technician or the developer may apply these packages to the computer rather than on surface devices.
To hide the applications displayed as optional applications during the deployment you need to go to the properties of each application and select the Hide this application in the Deployment Wizard.
How to define protocols explicitly?
If you want to explicitly define the protocols, follow the steps given below.
Step 1 – Go to the properties of the surface deployment task sequence from the MDT deployment workbench.
Step 2 – You now need to go to the task sequence and then go to the State restore. From there select the Install applications from the task sequence. The above can also be located between the pre-application and post-application windows update steps.
Step 3 – Now you need to create a new Install application. To do so use the Add button from the General category.
Step 4 – In the properties tab, Select Install a single application.
Step 5 – Now, you can select the desired EAP protocol from the list which will be displayed.
Step 6 – For each desired protocol repeat steps 2 through 5.
Conclusion
The above information tells all about what is Cisco LEAP module, whether it is safe or not and whether it is safe to remove it or not. The steps are explained thoroughly to help you download Cisco LEAP module successfully on your devices.